To connect your account, you must log into the Tradovate web portal using a desktop browser, sign the Non-Professional data agreements, and select Simulation mode. Knowing exactly how to set up Tradovate for Apex Trader funding prevents data delays and ensures proper order execution.
Read this step-by-step guide by H2T Funding to configure your workspace, avoid API limits, and connect third-party platforms effectively.
Key takeaways:
- Desktop-only setup: You must use a computer web browser not the mobile app for the initial login and agreement signing.
- Setup process: Log in via a desktop browser, sign the Non-Professional agreements, wait 10-90 minutes for data activation, and launch in Simulation mode.
- 10 to 90-minute data activation: Live market data takes time to process after signing the agreements. Wait at least 90 minutes before contacting support.
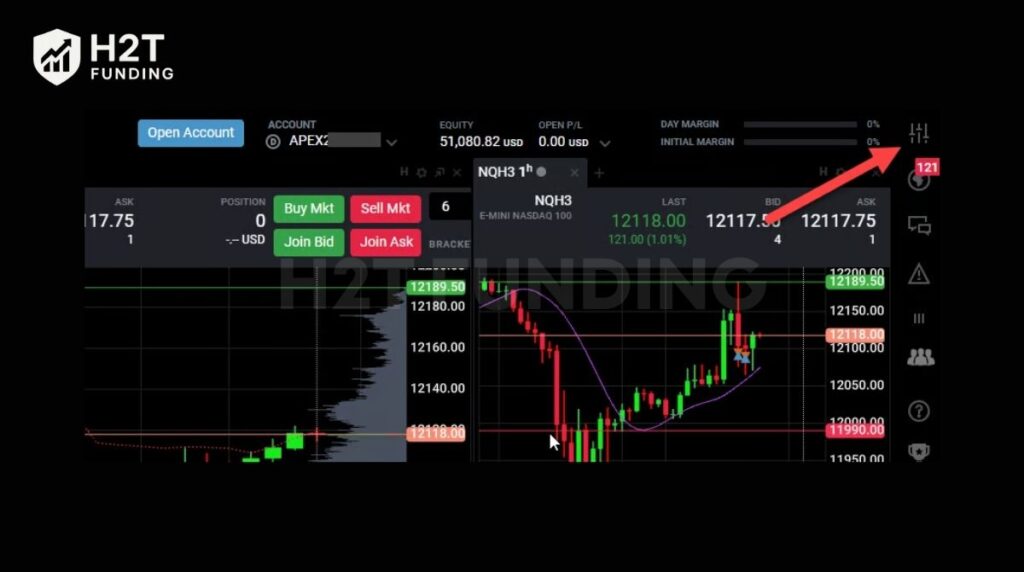
- White tickers = Live data: Only place trades when your instrument tickers turn white (indicating live data). Orange tickers mean your data is delayed.
- 5,000-action API limit: Tradovate restricts trading activity to 5,000 unique actions (placing, modifying, canceling) per 60-minute window.
- 100-contract order maximum: The platform limits orders to a maximum of 100 contracts, including the total combined contracts when using the group copy trader.
- Simulation mode only: All Apex accounts, including active Performance Accounts (PA), operate exclusively under the Simulation trading mode.
Last verified: June 2026
1. What you need before setting up Apex Trader Funding
Before accessing the trading platform, you must prepare the correct credentials and use the appropriate hardware. Knowing how to set up Apex Trader accounts properly requires following the strict technical guidelines outlined by the firm.
To ensure a smooth connection, gather the following items:
- Apex Tradovate credentials: You need the exact username and password provided in your welcome email. Tradovate-based usernames typically feature an underscore (for example, Apex_123456).
- Space-free formatting: Ensure your Apex Trader Funding login information does not contain any spaces at the beginning or the end when copying and pasting.
- Desktop web browser: The initial configuration cannot be performed on a smartphone or tablet. You must use a computer to sign the mandatory data agreements.
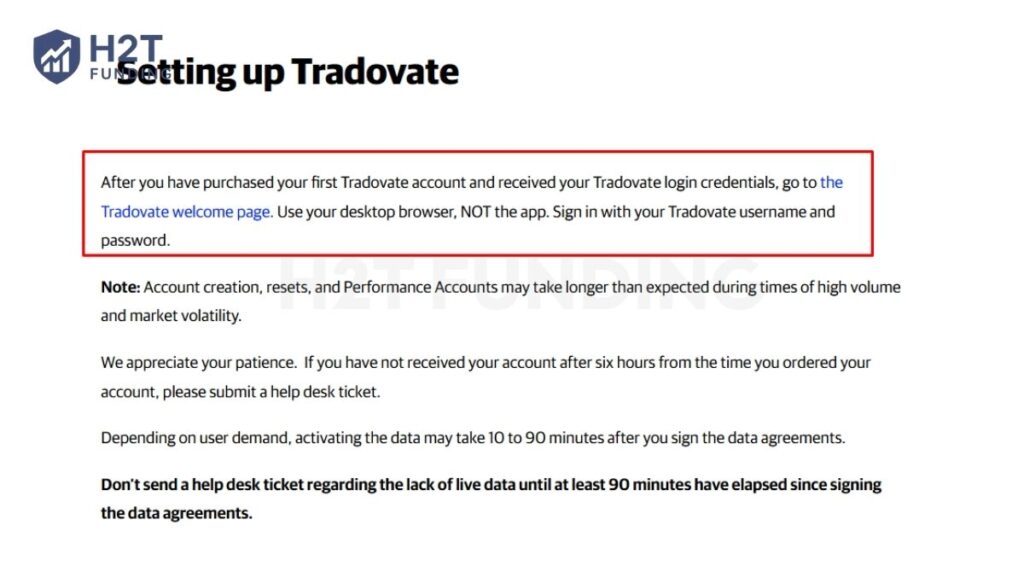
Regarding the device requirement, the official documentation strictly mandates the use of a computer browser for the first login:
“After you have purchased your first Tradovate account and received your Tradovate login credentials, go to the Tradovate welcome page. Use your desktop browser, NOT the app.” Source: Apex Trader Funding Help Center – Setting up Tradovate
Once you complete this initial desktop setup, you gain the ability to monitor trades on other devices. However, you should note that the Tradovate mobile application restricts visibility, displaying a maximum of five accounts simultaneously.
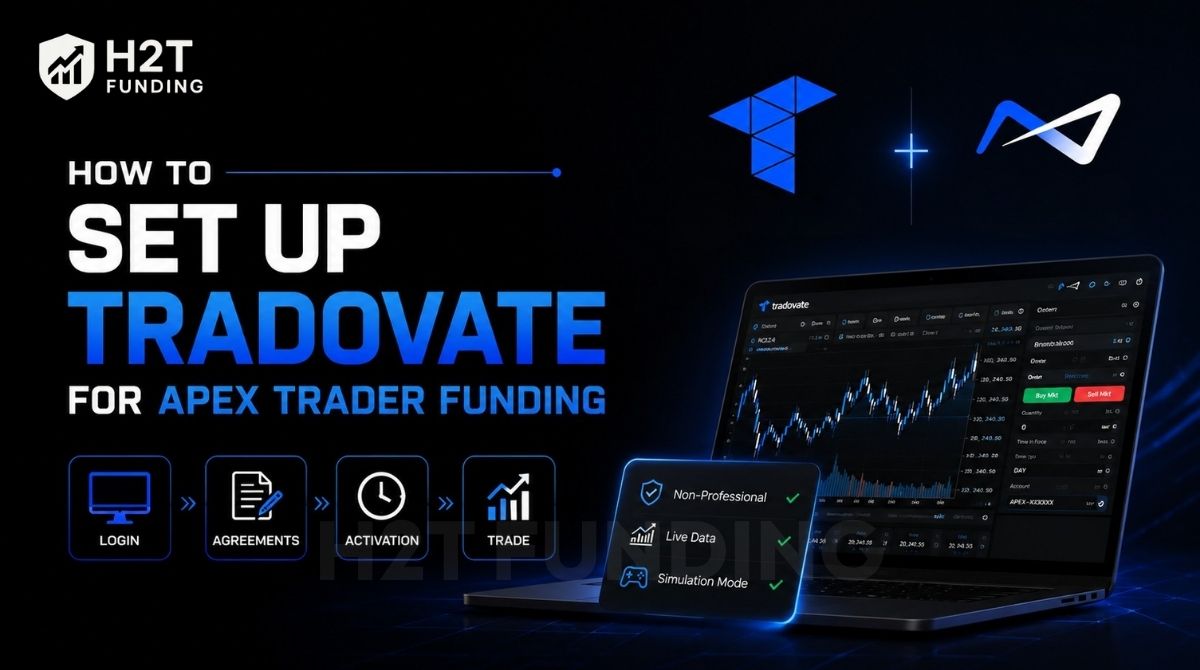
2. Step-by-step: How to set up Tradovate for Apex Trader Funding
Completing the initial configuration in the correct order prevents common errors and data connection issues. To properly connect your account, you must follow these four core steps:
- Step 1: Access the native web portal using your desktop.
- Step 2: Sign the market data agreements as a Non-Professional.
- Step 3: Wait 10 to 90 minutes for live data activation.
- Step 4: Launch the platform exclusively in Simulation mode.
Follow this sequence exactly to learn how to set up Tradovate for Apex Trader funding without delays.
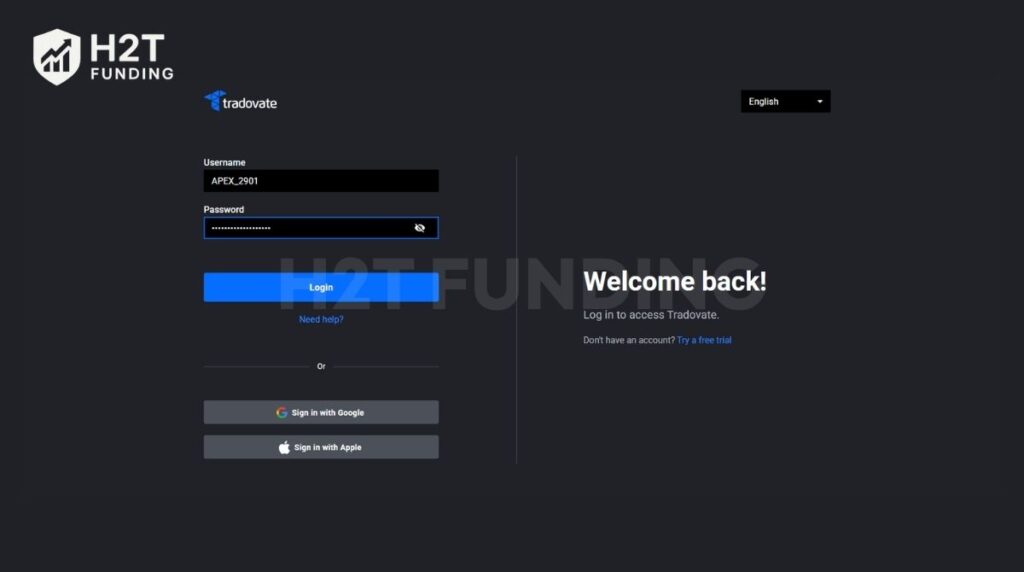
2.1. Step 1: Access the native web portal
Navigate to the Tradovate web login page using your computer browser. Enter the specific username and password provided in your Apex welcome email. Pay close attention to formatting when entering your credentials. As mentioned, pasting hidden spaces is a frequent cause of login failures, so double-check your inputs carefully.
2.2. Step 2: Sign the market data agreements
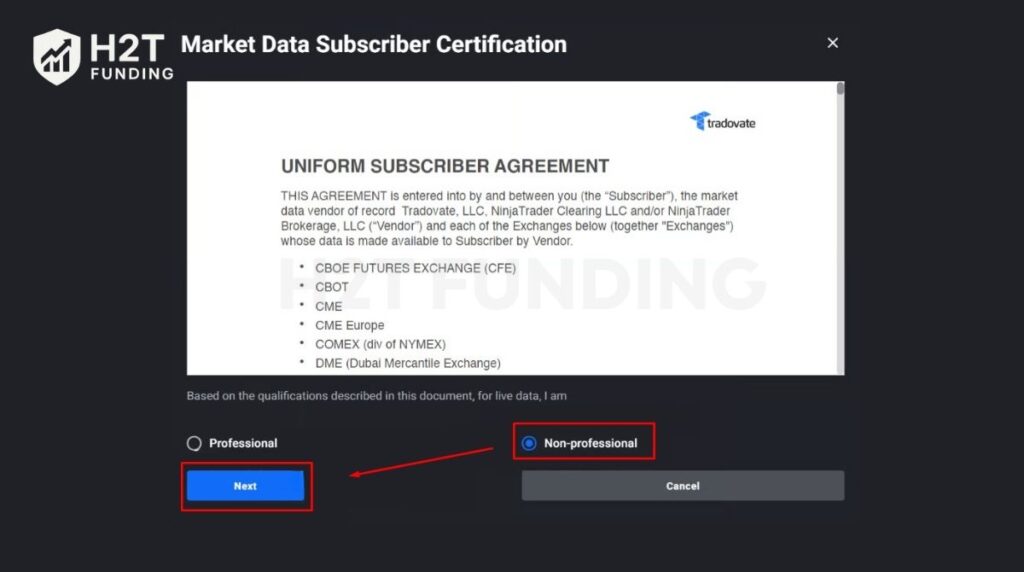
Upon logging in for the first time, a Market Data Subscriber Certification window will appear. You must fill out your information and sign the required Uniform Subscriber Agreement.
It is mandatory to select the Non-professional classification. If you accidentally select the Professional option, you will incur monthly data fees exceeding $115, which are not covered by your evaluation or funded account.
2.3. Step 3: Wait for live data activation
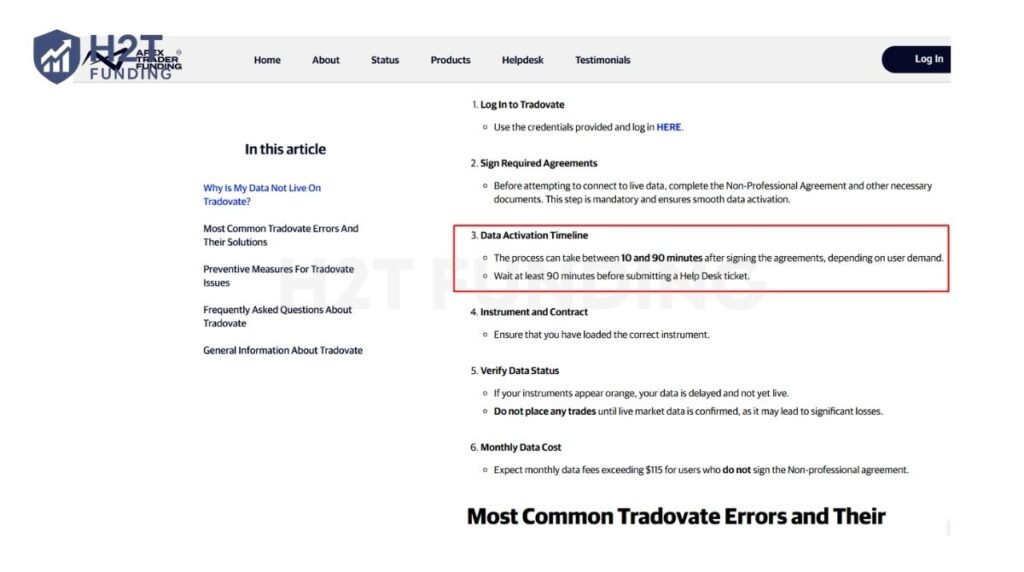
Your live market data will not activate immediately after signing the agreements. Depending on server volume, the activation process takes anywhere from 10 to 90 minutes.
This delay is a widely discussed topic among users. As Reddit user u/abortmission37 noted in the r/Tradovate community (posted 3 years ago): “I followed these instructions… Took like 2-3 hours for my Tradovate Apex sim account to display chart data. Didn’t do anything aside from login in and out.”
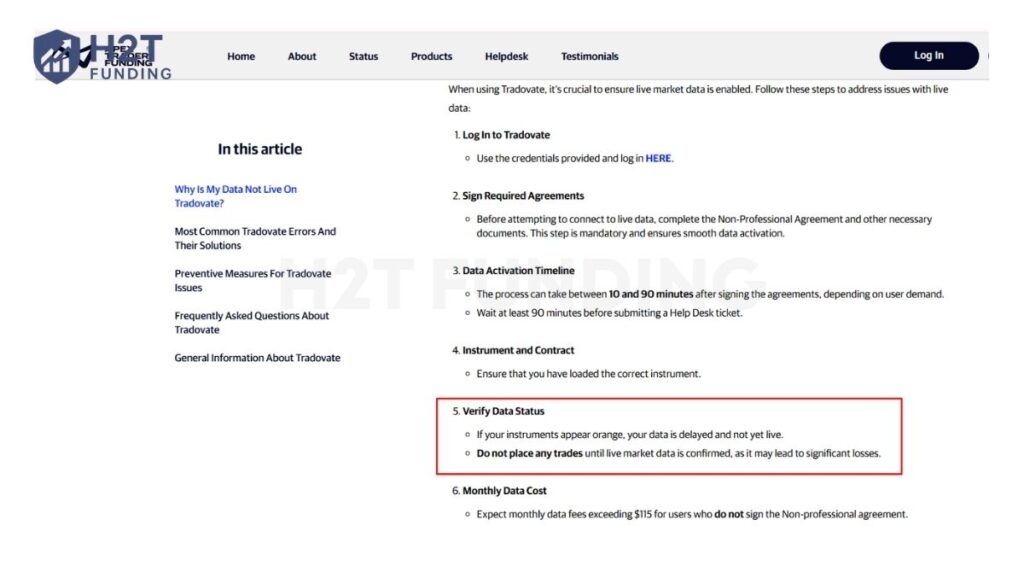
Apex specifically requests that traders wait at least 90 minutes before submitting a help desk ticket regarding missing data. You can verify your data status by looking at the instrument tickers on your chart:
- Orange tickers: Your data is delayed. Do not place any trades, as executing orders with delayed data can cause significant losses.
- White tickers: Your live data is active and ready for trading.
2.4. Step 4: Launch in Simulation mode
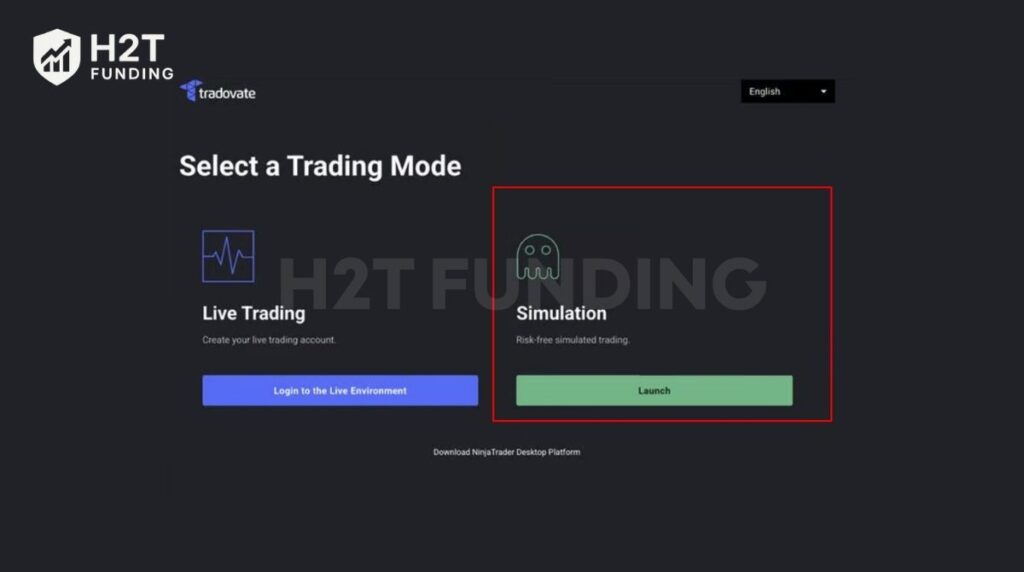
Once your data is active, you may need to log out and log back in to refresh the system. You will then reach a screen asking you to select a trading mode.
You must select Simulation. It is important to note that all Apex accounts, including active Performance Accounts (PAs), function entirely within a simulated environment.
Click Launch to access your dashboard. From here, you can customize your charts and continue with your Tradovate platform tutorial, Apex setup to prepare for live market conditions.
The most common mistake during setup is impatience. Attempting to execute a trade while the tickers are still orange often leads to order rejection or inaccurate pricing. Always verify your data connection before placing your first order.
3. Connecting Tradovate to third-party platforms
While Tradovate offers a convenient web interface, most professional traders prefer linking to third-party platforms to unlock advanced features. TradingView is the go-to choice for superior charting tools and community indicators, while NinjaTrader Desktop is essential for utilizing ATM strategies (automated stop-losses and profit targets) and more robust risk management. The two most common integrations are TradingView and NinjaTrader.
3.1. Apex Trader Funding TradingView setup
Connecting your account to TradingView requires an initial activation step within the Tradovate web portal. If you skip this step, TradingView will deny your access.
Follow these 5 steps to complete the Apex Trader Funding TradingView integration:
Step 1: Log in to your Tradovate platform and navigate to the Application Settings.
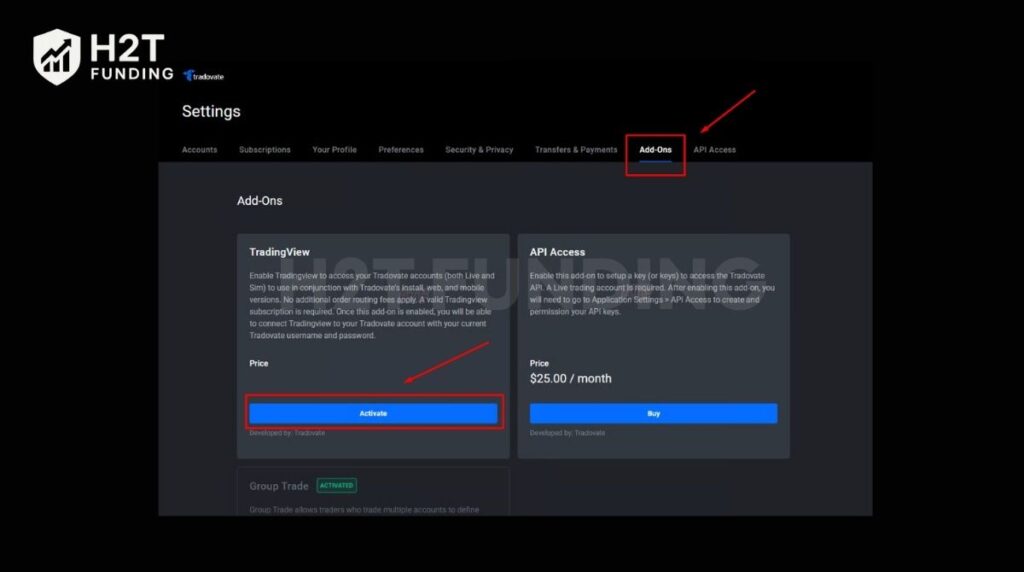
Step 2: Select the Add-Ons tab and activate the TradingView add-on.
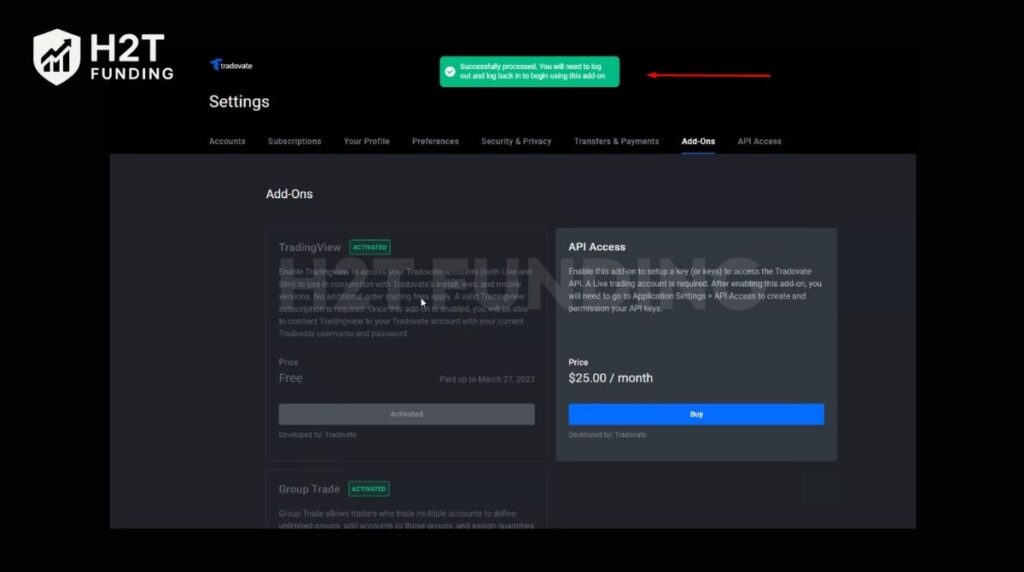
Step 3: Log out and log back into Tradovate to finalize the activation.
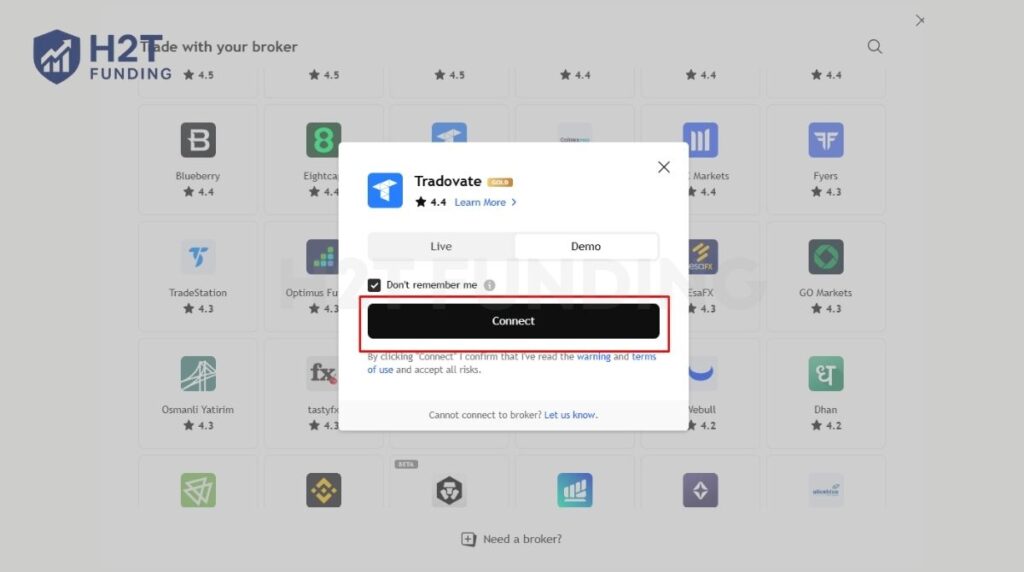
Step 4: Open TradingView, click the Trade panel, and select the Tradovate icon.
Step 5: Connect using your Apex/Tradovate demo credentials.
Important Renewal Notice: Your Apex Trading TradingView connection requires strict monthly maintenance. Failing to reactivate this connection causes the integration to go down and may result in an unexpected prompt charging you for the add-on. To prevent connectivity errors, Apex mandates the following solution:
“Why is TradingView Charging Me $9.99 for an Add-On? Cause: You need to renew your free TradingView subscription monthly. Solution: Meet the eligibility requirements for free access, and remember to renew your subscription every 30 days.” Source: Apex Trader Funding Help Center – Tradovate Frequently Asked Questions.
3.2. Connecting via NinjaTrader 8.1
You can also trade your Tradovate accounts directly inside the NinjaTrader 8.1 desktop platform. This requires configuring a specific connection and adjusting a system setting to prevent software errors.
Here is how to set up the connection:
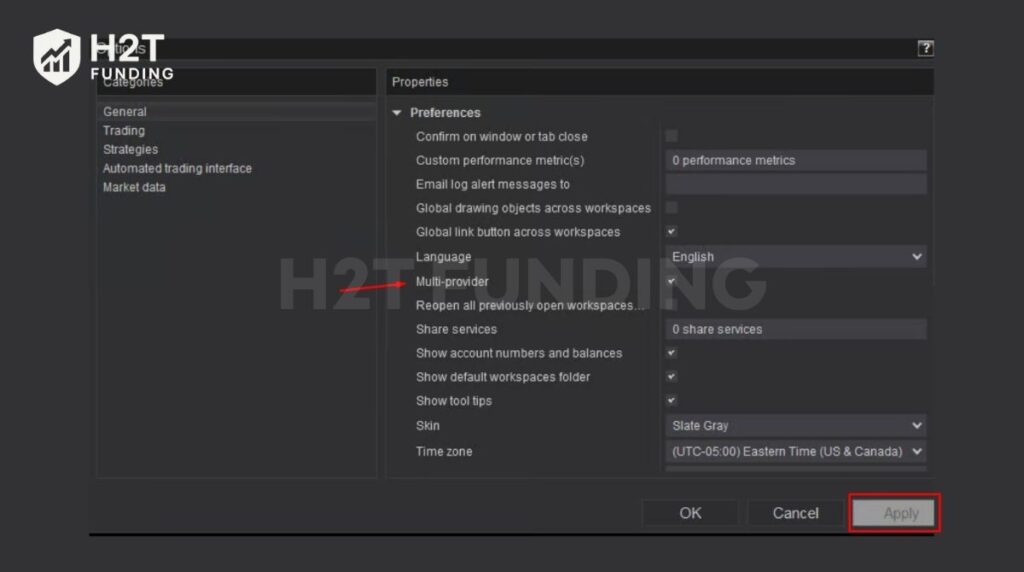
Enable Multi-Provider Mode: In the NinjaTrader Control Center, go to Tools > Options > General. Check the box labeled “Multi-provider,” click Apply, and restart NinjaTrader.
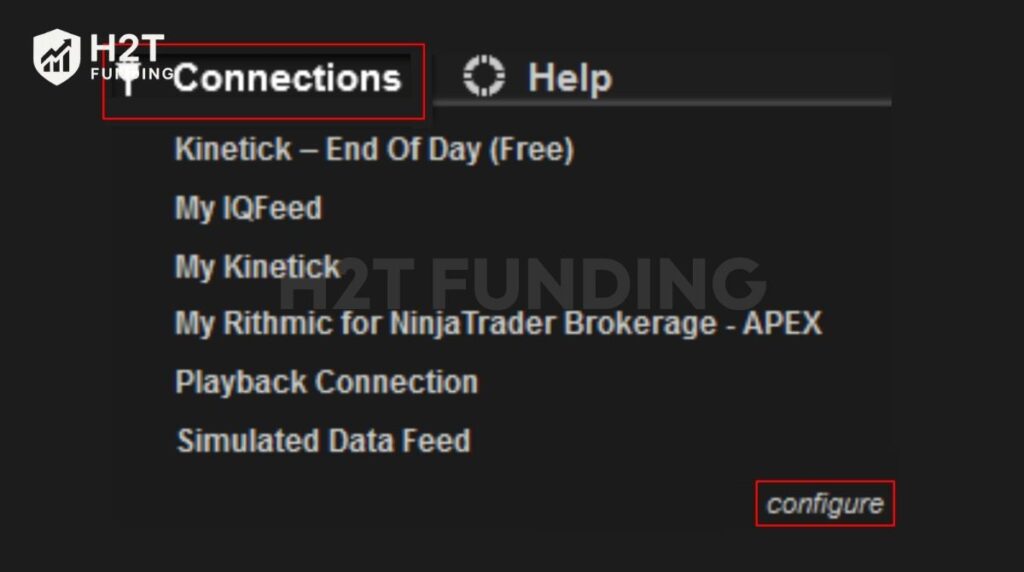
Configure the Connection: Go to Connections > Configure. Select NinjaTrader from the Available list and click Add. Enter your Tradovate username and password in the Properties section, then click OK.
Preventing the “Input String” Error: Many users encounter a software error reading “Input string was not in a correct format” when connecting Tradovate to NinjaTrader. To fix or prevent this issue, you must adjust your symbology settings:
- Click on your profile icon in the NinjaTrader dashboard and select Settings.
- Navigate to Preferences.
- Under Symbology Display Style, change the setting to Numeric.
- Save your changes and restart NinjaTrader.
Read more:
4. How to copy trade on Apex Tradovate
Managing multiple evaluations or funded accounts manually is difficult. Fortunately, the platform includes a built-in feature for Apex Trader Funding copy trading, allowing you to mirror executions across several accounts simultaneously.
4.1. Enabling and configuring the group trade feature
To activate the built-in copier, log into Tradovate in Simulation mode and navigate to your Application Settings. Select the Add-Ons tab and activate the “Group Trade” feature. You must log out and log back in for this tool to become active.
Once reconnected, learning how to copy trade on Apex Tradovate requires proper group configuration:
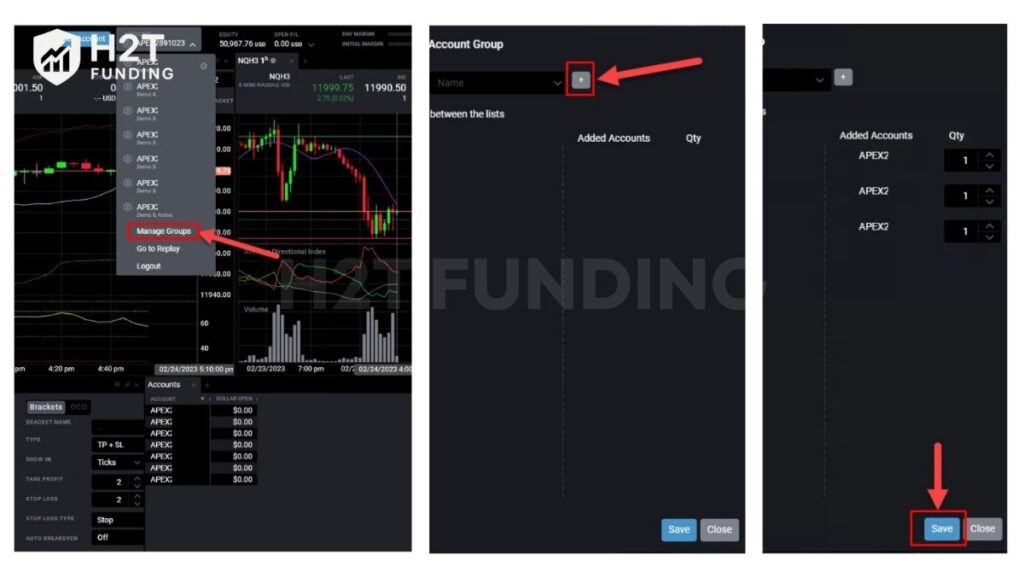
- Open the accounts drop-down menu at the top of your chart and select Manage Groups.
- Click the “+” icon to create and name a new group.
- Drag and drop the specific accounts you wish to trade from the Available list to the Added Accounts list.
- Click Save to finalize the group creation.
Note: This guide applies exclusively to the NinjaTrader Desktop version installed on Windows. These advanced connection features are not available on the Web or Mobile platforms.
4.2. The quantity multiplier rule
When group trading, your order quantity (Qty) must be an exact multiple of the number of accounts in your active group. If you input an incorrect number, the platform will display an error message and reject the order.
For example, if you link three accounts and want to trade two contracts per account, your total order quantity must be six.
4.3. Flattening group trades properly
Closing positions correctly is vital when managing multiple accounts. You must ensure your specific account group is selected in the drop-down menu before closing a trade.
If the group is not selected, the platform will only close the position for the single active account. This leaves the other accounts in the group exposed and may accidentally open a new, contrary position on the primary account.
Warning: Tradovate API request limits: Group trading significantly increases the amount of data sent to the broker. You must closely monitor your activity to avoid violating Tradovate’s strict API limitations.
- 5,000-Action Limit: Users can only initiate 5,000 unique actions per 60-minute window. Placing, modifying, and canceling an order count as separate actions.
- Action Multipliers: When trading in a group, every account counts individually. Placing one order across 20 accounts consumes 20 actions. Modifying that order consumes another 20 actions.
- Contract Maximums: The maximum number of contracts per order is 100. This is the combined total across all linked accounts, not the limit per individual account.
If you reach the 5,000-action limit, the platform blocks further actions until the 60-minute window resets. Tradovate cannot automatically flatten your accounts if you lock yourself out, leaving you responsible for any resulting losses.
5. Apex Trader Funding instruments & commissions on Tradovate
Understanding exactly which assets you are allowed to trade and how costs are calculated is crucial for maintaining your account. Tradovate simplifies this process, but strict rules apply to the allowed Apex Trader Funding instruments.
5.1. Allowed trading instruments
Apex allows traders to access a wide variety of CME Group markets. Attempting to trade an unsupported instrument will simply result in a rejected order without causing a rule violation or penalty.
The approved instrument list includes:
- Equity Futures: E-Mini S&P 500 (ES), E-Mini NASDAQ (NQ), E-Mini Russell (RTY), E-Mini Dow (YM), and Midcap 400 (EMD).
- Energy & Metals: Crude Oil (CL), Natural Gas (NG), Gold (GC), Silver (SI), and Copper (HG).
- Currency & Agricultural Futures: Major currency pairs (6E, 6B, 6J) and commodities like Corn (ZC) and Wheat (ZW).
- Micro Futures: Micro equivalents for equities, metals, and currencies (MES, MNQ, M2K, MGC).
- Cryptocurrencies: Micro Bitcoin (MBT) and Micro Ether (MET) only. Standard mini crypto contracts are not supported.
Important Restrictions: As of March 13, 2024, ICE US products are no longer offered. Additionally, trading EUREX instruments (such as the FDAX or FGBX) requires purchasing a separate exchange data subscription directly through the platform.
5.2. How commissions are deducted
You do not need to calculate trading costs manually. Apex Trader commissions are automatically deducted from your account balance the moment a trade is executed.
To track these costs, navigate to the Tradovate Performance tab:
- Gross P&L: Displayed in blue.
- Commissions: Displayed in red.
- Net P&L: The final calculated amount after deducting the red commission value from the blue gross profit.
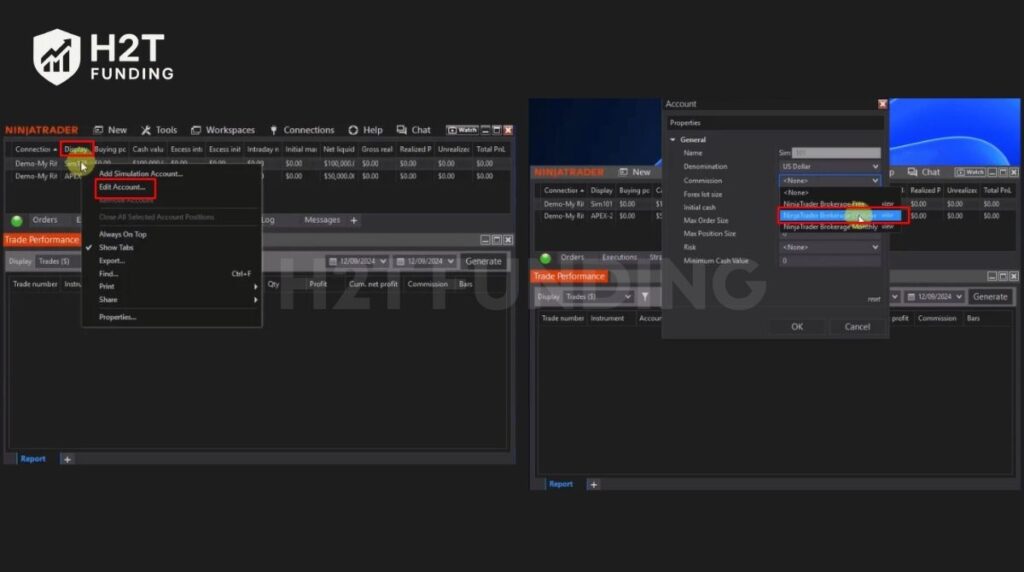
If you choose to link your Tradovate credentials to NinjaTrader, these commissions might not reflect automatically in your balance by default. NinjaTrader users must manually enable commission tracking by defining their settings and applying the “lifetime” commission template.
6. Common Tradovate setup errors & troubleshooting
Technical glitches during initial configuration can be frustrating. Before submitting a help desk ticket, review these 3 frequent connection issues. Most setup errors stem from minor formatting or synchronization problems that take only minutes to resolve.
6.1. Error 1: “Input string was not in a correct format”
This error occurs when attempting to load Tradovate accounts inside the NinjaTrader 8.1 desktop platform. It happens because NinjaTrader’s default symbology display clashes with Tradovate’s data format.
The Fix: You must change how NinjaTrader reads the data.
- Open the NinjaTrader dashboard settings.
- Select Preferences.
- Locate the “Symbology Display Style” section and change the setting to Numeric.
- Save the changes and restart NinjaTrader.
6.2. Error 2: “Failed to log in” on TradingView
If you receive a “TradingView Not Entitled to Access Your Account” message, the platform is blocking your credentials because the backend link is inactive.
The Fix: You likely missed the mandatory 30-day renewal cycle mentioned earlier. To fix this, log into your Tradovate web dashboard, navigate to the Add-Ons tab, and manually reactivate the free TradingView subscription. Remember to perform this action on the exact same date each month to maintain uninterrupted access.
6.3. Error 3: Endless loading, blank screens, or captcha loops
If the main Tradovate login button becomes completely unresponsive, gets stuck on a “Loading…” screen, or traps you in an endless Captcha security loop, the issue is hardware-related. This occurs when your computer’s internal clock is out of sync with the broker’s servers.
The Fix: You need to synchronize your Windows clock.
- Right-click the clock located on your Windows Taskbar.
- Select Adjust date/time.
- In the settings window, click the Sync now button.
- Restart your browser and attempt to log in again.
7. FAQs
Yes. When purchasing a new evaluation, Apex Trader Funding offers traders the choice between Tradovate and Rithmic data feeds.
The initial platform configuration takes less than five minutes. However, live data activation requires 10 to 90 minutes after signing the Non-Professional agreements. You cannot execute trades until this activation process is complete and your chart tickers turn white.
No. Accounts cannot be transferred between platforms under any circumstances. If you wish to switch data providers, you must purchase a brand new evaluation account. The official Apex policy strictly states: “No, accounts cannot be transferred. You will need a new Paid/Performance Account (PA). Account days, balances, and history cannot be moved between Tradovate and Rithmic.” Source: Apex Trader Funding Help Center – Tradovate Frequently Asked Questions.
The platform access and basic Level 1 data feeds are included with your Apex account. However, advanced Level 2 data packages (such as the CME Bundle) or access to the EUREX exchange ($23/month) require additional, out-of-pocket subscriptions purchased directly through the Tradovate portal.
Orders are typically rejected for two reasons. First, your order size may exceed your specific account’s maximum contract limit. Second, you may be violating the platform’s hard limit of 100 maximum contracts per order, which applies to the total combined quantity when using the group copy trader.
This is an automated platform feature designed to clear inactive data. Blown accounts are automatically removed from the Tradovate dashboard at the end of the trading day. Once the system clears the account, traders cannot recover the data. The official policy clearly states: “Why is my account no longer showing after it was blown? Blown account(s) on Tradovate are automatically removed at the end of the trading day. Once removed, you will no longer have access to the trade history or the account itself.” Source: Apex Trader Funding Help Center – Tradovate Frequently Asked Questions.
Yes, you can monitor trades and execute orders using the Tradovate mobile app or an iPad. However, you cannot perform the initial account configuration on a mobile device. You must complete the first login and sign the data agreements using a desktop web browser. Furthermore, traders managing multiple evaluations must be aware of a strict interface limitation. According to the official platform restrictions: “Mobile Platform Account Visibility: The mobile platform displays a maximum of five accounts simultaneously. A limit of five accounts is visible on the mobile platform. DISCLAIMER NOTE: This is a Tradovate rule and cannot be controlled by Apex Trader Funding.” Source: Apex Trader Funding Help Center – Tradovate Mobile App Limitations.
8. Conclusion
How to set up Tradovate for Apex Trader Funding? To complete the process correctly, you must log in via a desktop browser, sign the Non-Professional data agreements, wait for your tickers to turn white, and launch the platform in Simulation mode. Following this specific sequence prevents common login errors and ensures your orders are executed with accurate, live market data.
Setting up your platform is just the beginning of a successful trading journey. To enhance your skills and stay updated on the latest rules, explore the comprehensive resources and tutorials available in the Prop Firm Guides category on H2T Funding.
Disclaimer: Prop firm rules, fees, and available funding platforms can change frequently. The data in this guide was verified as of June 2026. Always verify the current Terms and Conditions directly on the official Apex Trader Funding website before making any purchases.