Are you wondering exactly how to connect My Funded Futures to TradingView? The process requires selecting Tradovate as your broker within the Trading Panel. Before doing this, you must activate the integration add-on inside your dashboard.
Many beginners find linking accounts confusing, often missing out on crucial real-time market data. However, trading on your preferred charting platform should be a completely smooth experience. You simply need the provided demo credentials to start.
At H2T Funding, we review top prop firms and guide traders toward passing their evaluations. This quick tutorial will show you the exact connection process to get your charts ready within minutes.
Key takeaways
- Log in to Tradovate first to accept the non-professional data agreement.
- Navigate to your Application Settings and enable the free integration tool.
- Open a chart, select the broker logo, and enter your login details.
- Always choose the Demo tab when connecting, even if you hold a funded account.
1. How to connect My Funded Futures to TradingView
To properly answer how to connect My Funded Futures to TradingView, you must link both platforms using the official add-on. This requires accepting data terms and activating the integration inside your broker dashboard before opening any charts. Following these exact instructions will ensure a seamless connection setup for your trading platform.
- Step 1: Sign agreements & activate live data on Tradovate
- Step 2: Enable the TradingView Add-On
- Step 3: Log in via TradingView’s Trading Panel
1.1. Step 1: Sign agreements & activate live data on Tradovate
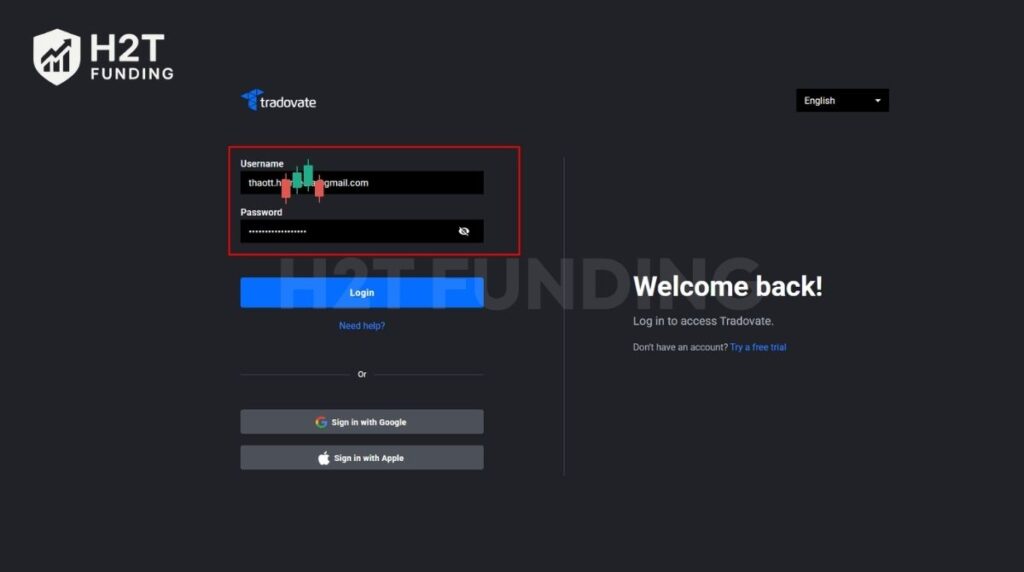
First, visit the official Tradovate website. You need to enter the specific login details provided inside your prop firm dashboard.
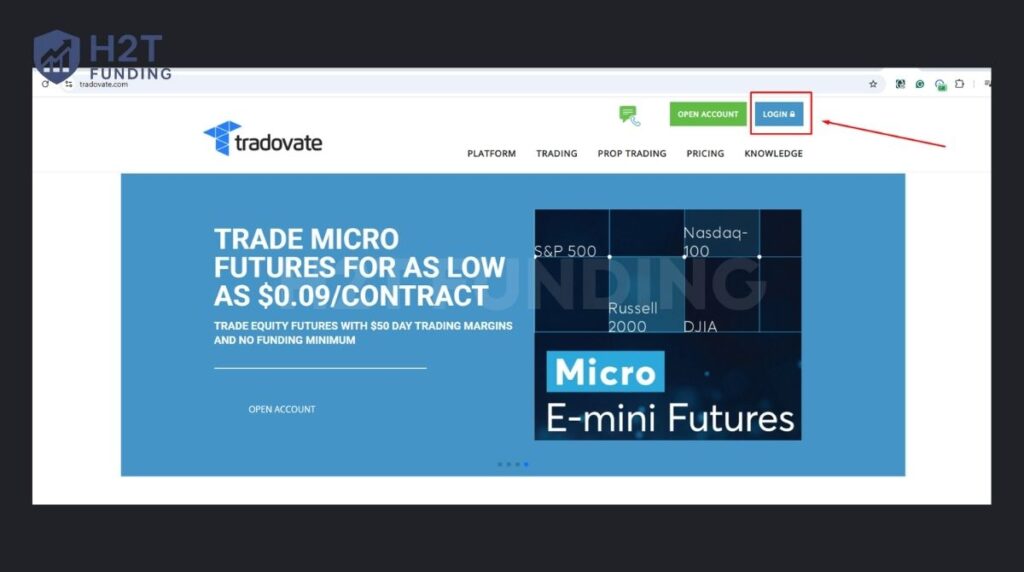
When you sign in for the first time, a mandatory prompt will appear on your screen. You must sign the non-professional agreement to proceed. Accepting this document is an absolute requirement to receive real-time market data.
Immediately after, you will be presented with a Select a Trading Mode screen. Since you are using a prop firm account for evaluation or trading, you must click Continue under the Simulation option. This ensures you are operating in the correct risk-free environment provided by MyFundedFutures.
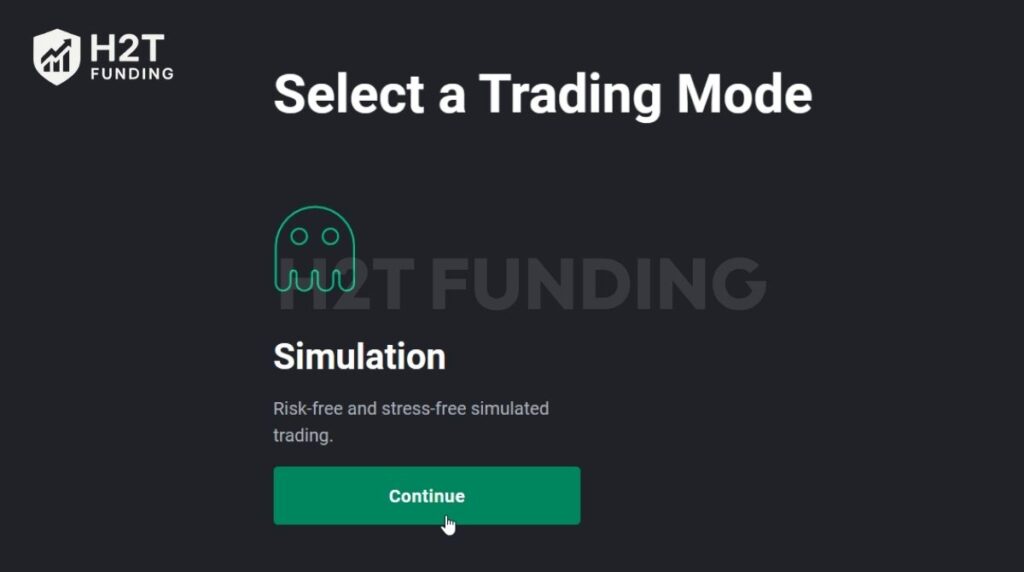
Getting this foundation right is incredibly important for your prop firm journey. Once your agreements are officially signed and the Simulation environment is active, the hard part is over. Your backend data feed is now fully authorized, making the actual platform integration in the next step incredibly fast and easy.
1.2. Step 2: Enable the TradingView Add-On
Once you accept the terms, look at the top-right corner of your dashboard. Click the Application Settings button to open your configuration menu.
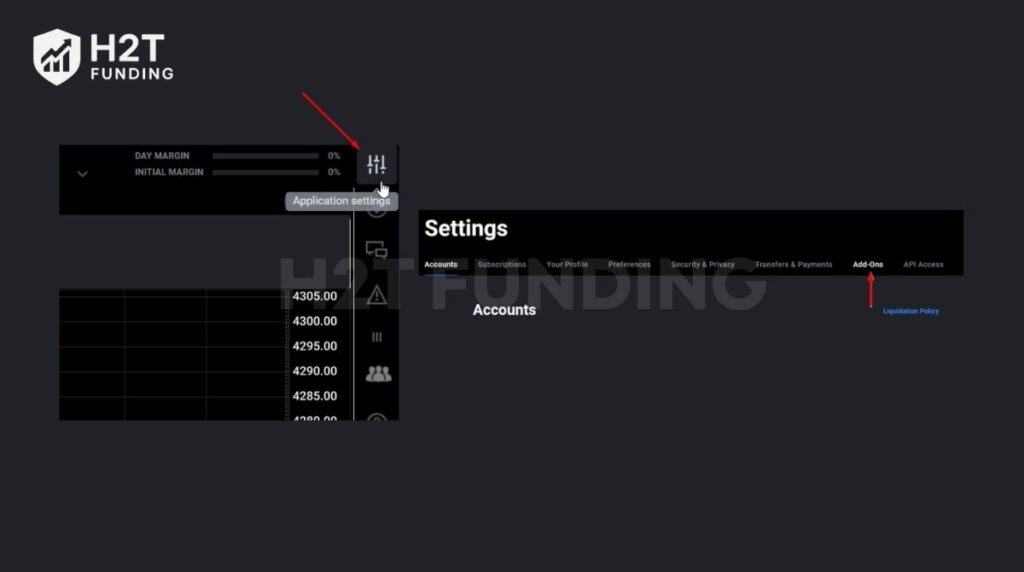
Next, navigate directly to the Add-Ons tab. Scroll until you find the integration tool, which is listed for free. Click the blue Activate button to enable it. A green pop-up message will confirm that you now have access to use the platform.
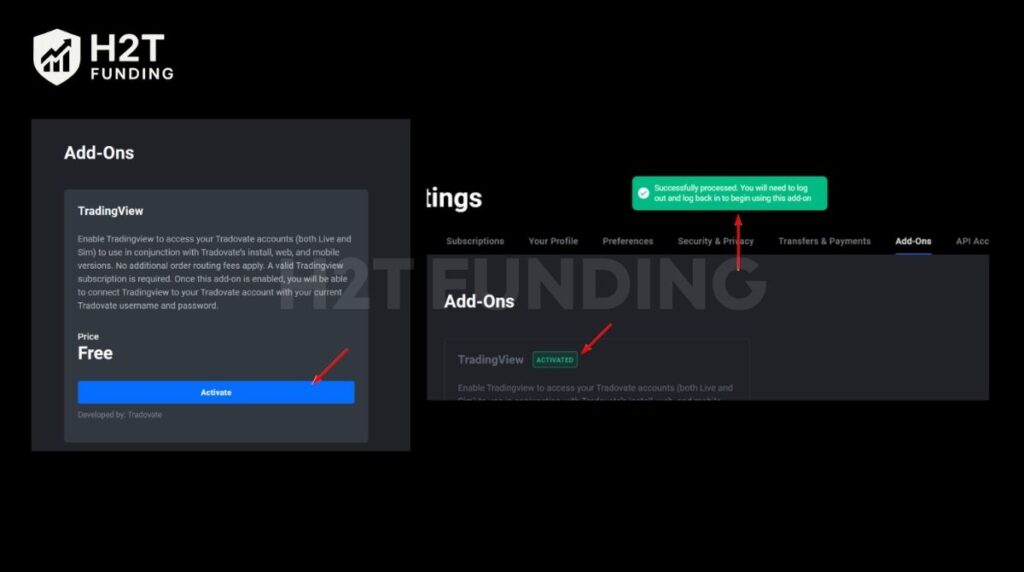
Pro Tip: Do not close your Tradovate tab until you physically see that green success message. It is incredibly common for beginners to assume the connection is automatic. Verifying this free activation right now saves you from dealing with annoying “not enabled” errors later on.
1.3. Step 3: Log in via TradingView’s Trading Panel
Head over to the main charting website and open a new chart. At the bottom of your window, click the Trading Panel tab to expand the menu.
Select the Tradovate logo from the supported list. A new login screen will pop up where you will enter your credentials again. For MyFundedFutures accounts, you should typically select the Demo tab during this step, as both evaluation and simulated-funded accounts operate in a non-executing demo environment.
Completing these three simple steps guarantees your account is properly linked. By signing the agreements and activating the add-on, your setup is fully ready for market analysis and order execution.
2. How to use My Funded Futures on TradingView
Learning how to use My Funded Futures on TradingView involves selecting your desired symbol and executing orders directly from your charts. Once the initial setup is complete, you can open a position using visual tools or rapid execution panels. This flexibility helps you adjust risk easily while trading.
2.1. Placing limit orders via the long/short position tool
This is the highly recommended method for most traders. Select the Long/Short Position Tool from your drawing panel, depending on whether you are planning on going long or shorting the market.
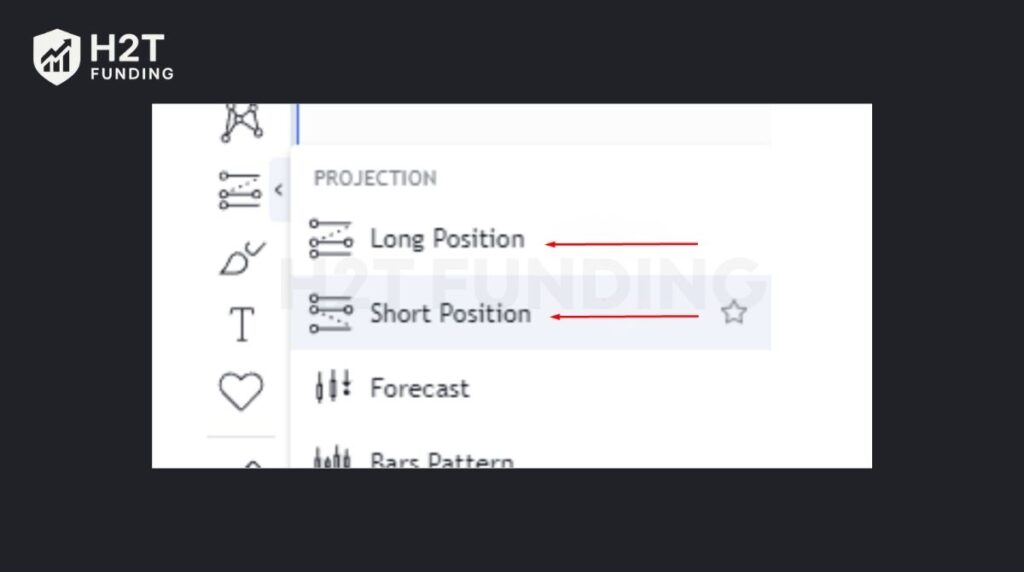
Place the drawing on your screen to set your desired Entry level. You can then drag the top and bottom edges to visualize your Stop Loss and Take Profit zones perfectly.
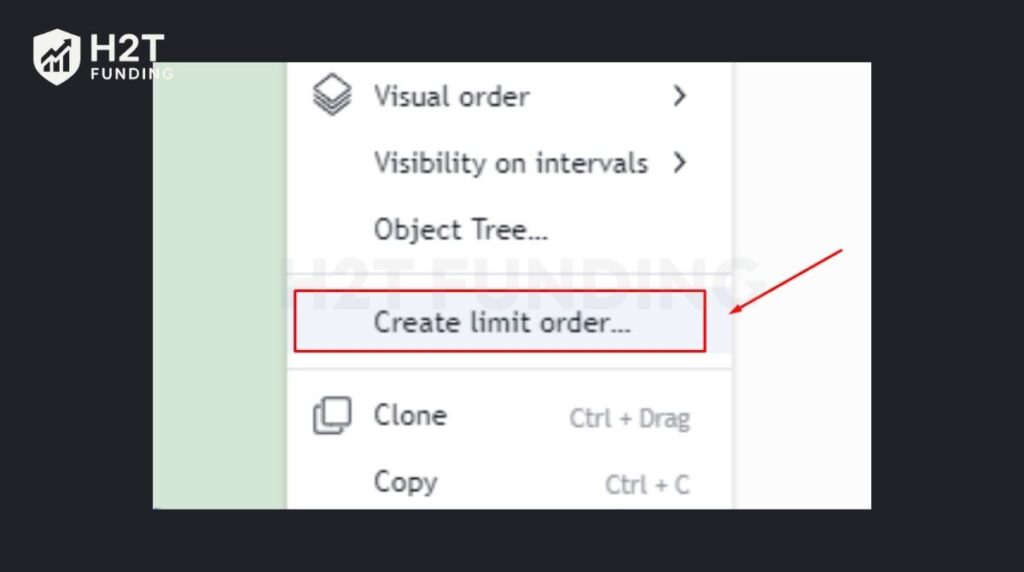
When your setup looks ready, right-click the tool directly on your screen. From the dropdown menu, select Create Limit Order to officially send your planned setup into the live market.
This visual approach is undoubtedly the safest way to execute trades, especially during highly volatile sessions. By setting your limits beforehand, you let the market come to you. However, if you ever need to jump into a fast-moving setup immediately, you will need to use a different execution style.
2.2. Quick market entry execution
For faster execution, look at the panel on the top-left corner of your screen. You will see colored buttons allowing you to instantly execute a Buy or Sell.
Before clicking anything, always check the numerical value in the middle box. This number represents the Quantity of Contracts you wish to execute.
Clicking these buttons instantly triggers a Market Entry. Because the execution is immediate, you cannot preset your exit levels beforehand.
You must perform a Manual Add process after your order fills. Hover your mouse over the vertical price axis and click the plus sign to place your protective stops and profit targets.
Mastering these basic execution methods gives you complete control over your daily trading plan. Whether you prefer visually dragging limit levels or executing rapid market orders, this integration handles both seamlessly.
3. Troubleshooting connection errors
Fixing connection errors usually requires checking your signed documents, verifying add-on activations, and ensuring you selected the correct server type. Experiencing technical hiccups can be frustrating, but the solutions are very simple.
- Missing Live Data: Traders often experience delayed quotes because they skipped a crucial step during the initial setup. You must sign the CME non-professional data agreements inside your Tradovate dashboard. Without these signatures, your broker connection will not authorize the real-time market data feed to your TradingView charts.
- TradingView is not enabled: If you receive this specific warning on the Trade Panel, the integration is likely offline. Go back to your broker dashboard and ensure you clicked the blue activation button. Traders sometimes rush and skip this step while Optimizing Futures setups.
- Login Fails: A very common mistake involves the pop-up window where you enter your username and password. Always ensure the Demo server is selected before trying to Buy or Sell anything. Using the Live server option will immediately reject your Account credentials. If issues persist, reaching out to Customer Support is your best next step.
Resolving these common mistakes is usually a very quick process. Double-checking your data agreements and server selection ensures your Trade activity remains uninterrupted.
Read more:
4. FAQs
The firm supports multiple options, including NinjaTrader, Tradovate, Quantower, ATAS, DeepChart, and TradingView. Traders can choose the software that best fits their specific style. You gain full Access to powerful analytical tools regardless of your final choice.
Yes, you can easily link them using the integration add-on found in your settings. This feature lets you execute orders directly from your screen. You simply need to enable it inside your application menu before logging in.
You can integrate several major prop firms that support Tradovate or CQG routing, such as MyFundedFutures and Topstep. These companies utilize specific backend providers to allow seamless charting directly on the platform.
No, a paid subscription is not strictly required to start. You can successfully trade using the free basic plan. However, upgrading grants you Access to multiple layouts and advanced custom indicators.
Tradovate, NinjaTrader, Interactive Brokers, and Oanda are highly rated options. For proprietary trading, Tradovate is widely considered one of the most popular and highly rated bridges. It offers a very stable environment when you buy or sell your preferred Quantity of contracts.
5. Conclusion
Learning exactly how to connect My Funded Futures to TradingView takes just a few minutes when you follow the correct sequence. Securing your required agreements and turning on the official integration ensures you can quickly transition into executing your daily setups without any technical delays.
If you want to master new market techniques or find exclusive prop firm Discounts, we have the resources you need to succeed. Explore the Prop Firm & Trading Strategies category at H2T Funding to discover comprehensive reviews and expert tips for your next payout.