Yes, you can absolutely connect your Take Profit Trader account to NinjaTrader. Take Profit Trader NinjaTrader setup is a straightforward process that connects your funded account to a professional trading platform. By linking your Take Profit Trader dashboard credentials with NinjaTrader 8, you unlock advanced tools like automated stop losses and precise charting.
This guide by H2T Funding covers everything from basic connection steps to using ATM strategies, ensuring you are ready to trade in minutes.
Key Takeaways
- Easy Connection: You can connect to how to set up Take Profit Trader on NinjaTrader 8 using either CQG or Rithmic credentials found directly in your dashboard.
- Automation Power: The main advantage is using NinjaTrader’s ATM strategies to automatically place profit targets and stop losses for every trade you take.
- Required Tools: Before starting, ensure you have an active subscription and have installed the NinjaTrader 8 desktop application.
- Risk Reminder: While automation helps with discipline, it does not track your account rules. You must still manually monitor your intraday trailing drawdown to avoid failure.
1. What do you need before starting the setup?
Before you begin the connection process, you must have three essential elements ready to ensure a smooth experience. Having these items prepared beforehand will prevent common connection errors and save you time.
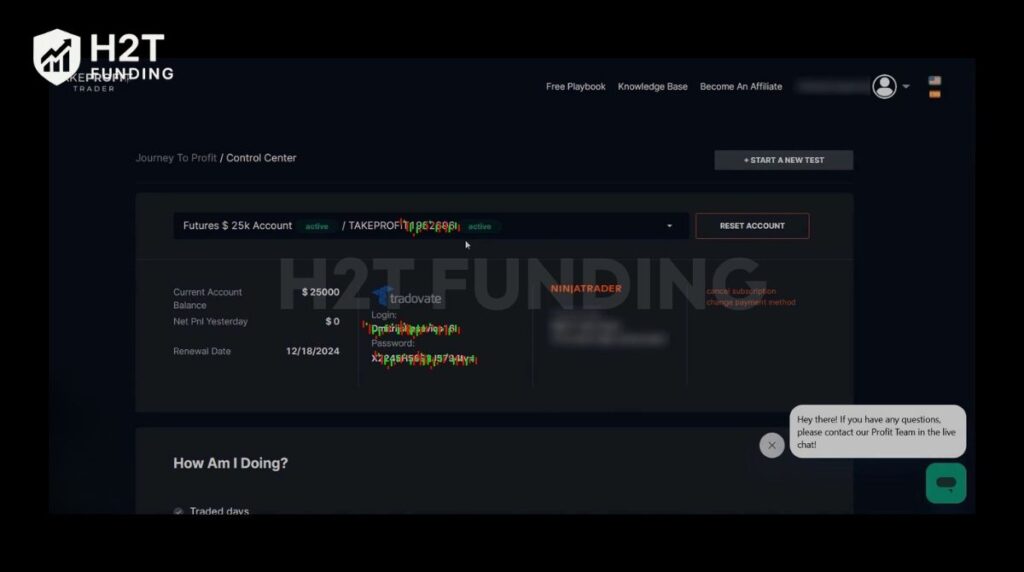
- An Active Take Profit Trader Account: You need a current subscription to proceed. During the sign-up process, you selected either a CQG or Rithmic data feed. Ensure your account status is active and not pending inside your user dashboard.
- NinjaTrader 8 Platform Installed: You must have the trading software installed on your PC to move forward. If you are learning how to set up Take Profit Trader on NinjaTrader, note that the desktop application is required. You can download the latest version directly from the official website or via the link provided in your dashboard.
- Your Login Credentials: These are specific trading credentials, not your general website login. Navigate to your dashboard to find your dedicated Rithmic or Tradovate (CQG) username and password. You will need to copy and paste these exact details into the platform later.
Once you have confirmed these three items, you are fully prepared to configure the platform. From experience, most initial connection errors happen because users mistakenly try to use their email address instead of the specific trading credentials. Keep your dashboard open in a separate tab to copy the exact username and password, ensuring a seamless setup process in the next steps.
2. Take Profit Trader NinjaTrader setup: A step-by-step guide
Configuring your connection correctly is the single most important step to ensure your trades are executed without delay or data issues. The process differs slightly depending on the data feed you selected during registration, so be sure to follow the specific instructions for your account type.
2.1. For CQG Data Feed Accounts (Using Tradovate Credentials)
If you have a CQG data feed, your first action must be to activate it on the Tradovate website. This is a mandatory prerequisite; skipping this step will result in a connection error inside NinjaTrader.
Step 1: Activate Your Data Feed on Tradovate (Crucial First Step)
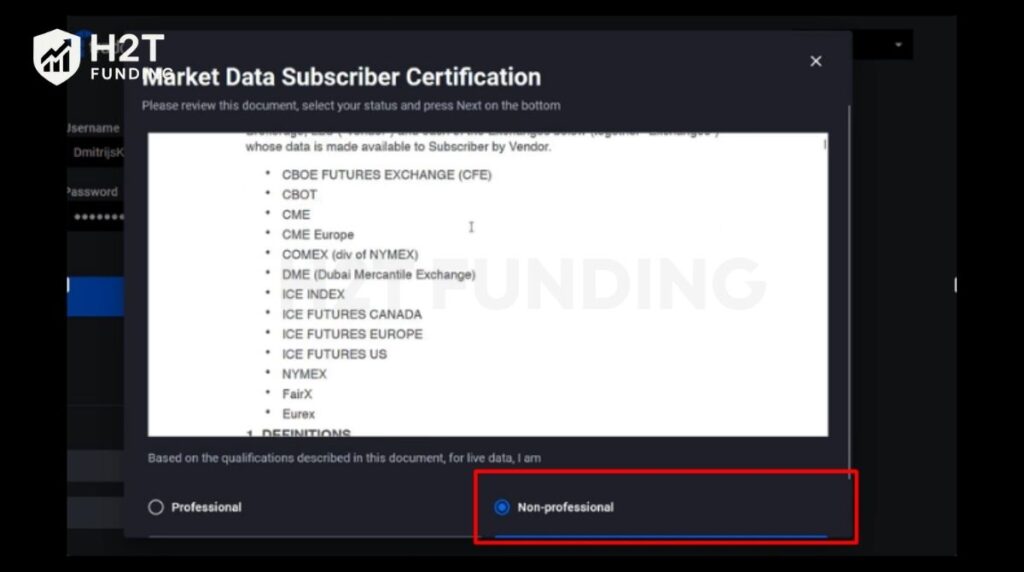
Log in to your Take Profit Trader dashboard and locate your CQG account. If its status is “Pending,” you must go to tradovate.com and log in using the credentials provided. You will be prompted to sign the Market Data Agreements. Be sure to select the “Non-Professional” option and click “Accept” to complete the process. Your TPT dashboard status should turn “Active” within 15 minutes.
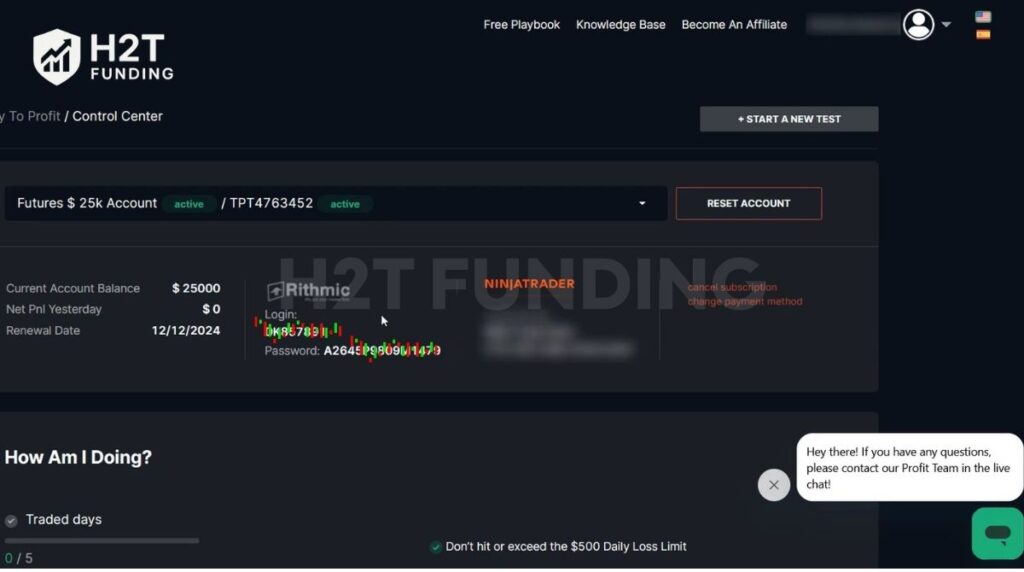
Step 2: Locate Your Credentials in the TPT Dashboard
Once your account is active, stay in your dashboard. You will see a username and password listed specifically for Tradovate. Copy these credentials rather than typing them manually to avoid errors.
Step 3: Configure the “NinjaTrader” Connection
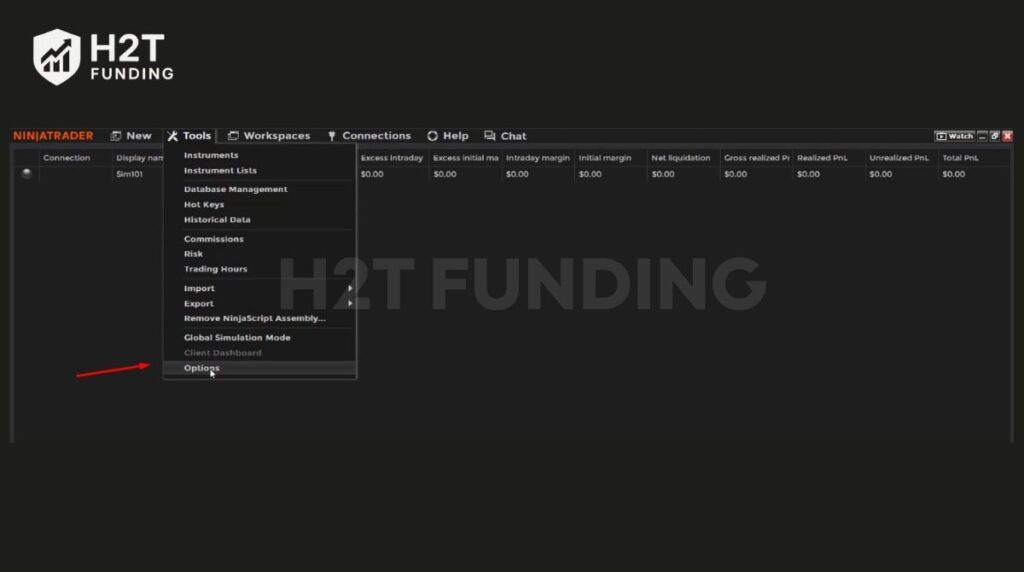
Open NinjaTrader 8 and click on Connections in the top menu, then select Configure. If you do not see the “configure” option, go to Tools > Options > General, check the box for “MultiProvider,” and restart the application.
Step 4: Enter Your Credentials and Select “Simulation”
In the configuration window, find and double-click the NinjaTrader connection option (do not select CQG). Paste your username and password into the respective fields. Crucially, you must select Simulation as the account type for the connection to work properly.
Step 5: Connect and Verify Your Account
Click “Apply” and then “OK” to save. Go back to the Connections menu and click on the new connection you just created. Look for the connection light in the bottom left corner of the Control Center; a green light indicates you are successfully connected.
Once your CQG account is activated and the NinjaTrader connection is configured, you’re all set. Remember that for this specific setup, you always use the “NinjaTrader” connection type in the software, even though the data comes from CQG/Tradovate. This is the most common point of confusion, and getting it right ensures a stable trading experience.
2.2. For Rithmic Data Feed Accounts
For traders using a Rithmic data feed, the setup process requires a specific connection configuration within NinjaTrader. Unlike CQG, you will need to activate your Rithmic data feed first, which is a simple but mandatory step.
Step 1: Activate Your Data Feed on Rithmic (Crucial First Step)
Before connecting to NinjaTrader, you must sign Rithmic’s market data agreements. Open the R | Trader Pro software (you can download it from their website), enter your credentials from the TPT dashboard, and set the “System” to Rithmic Paper Trading. Log in, and you will be prompted to sign two agreements. Select “Non-Professional” to complete this step.
Step 2: Find Your Rithmic Username and Password
Return to your Take Profit Trader dashboard and navigate to your Rithmic subscription. You will find your specific Rithmic user ID and password here. Keep this tab open or copy the information to your clipboard.
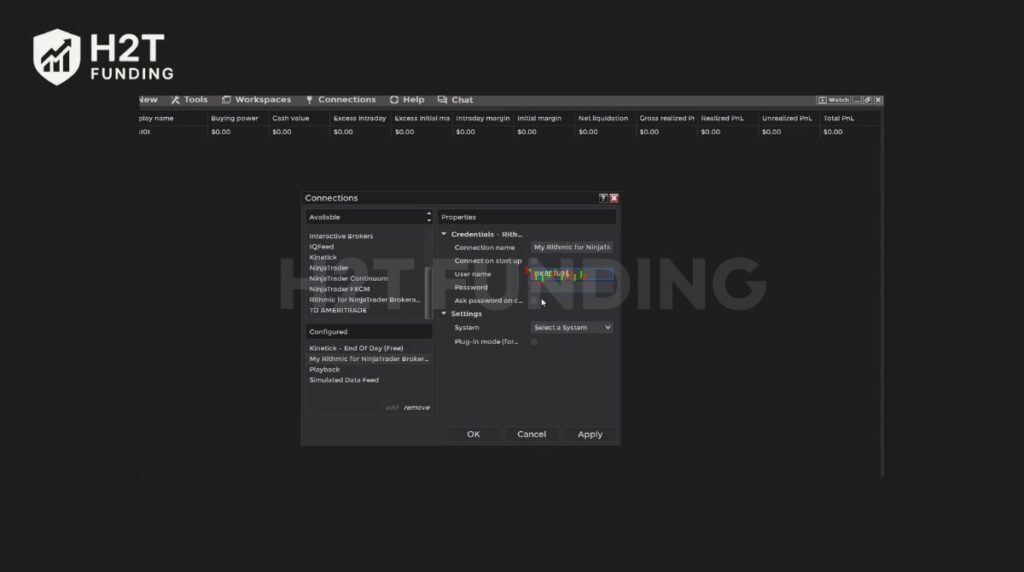
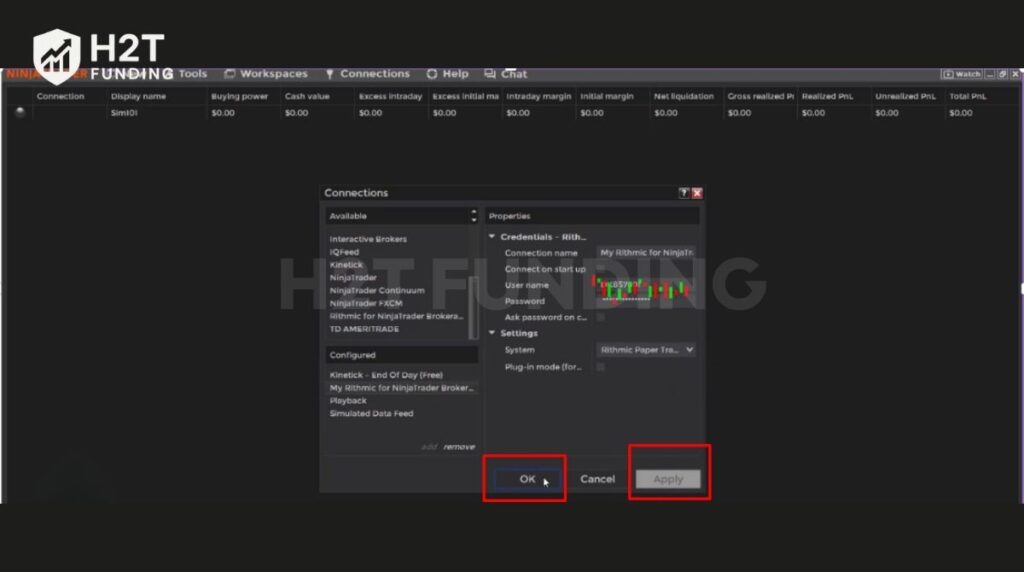
Step 3: Configure the “Rithmic for NinjaTrader Brokerage” Connection
Inside the NinjaTrader Control Center, go to Connections and then configure.
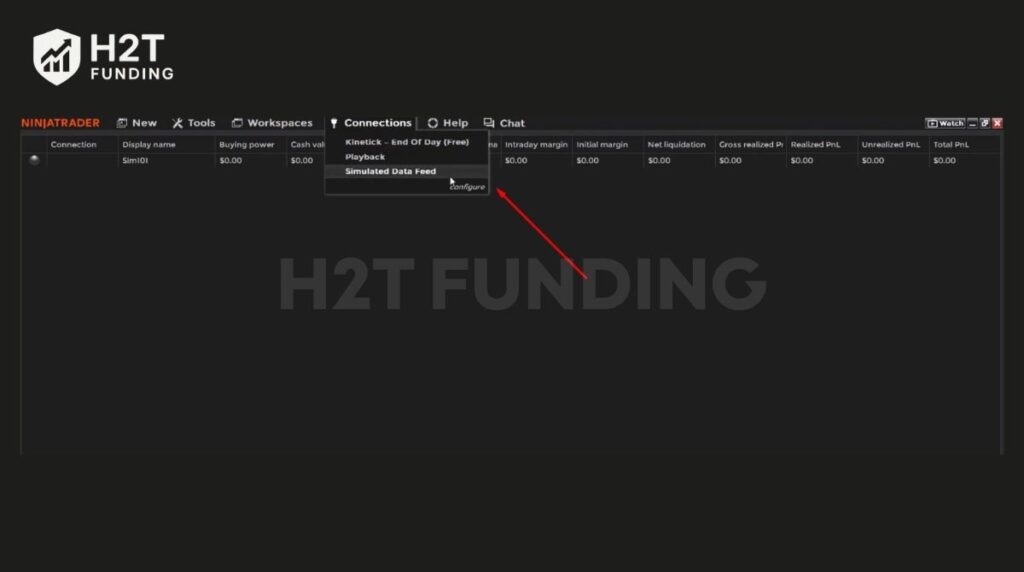
If you don’t see this option, enable “MultiProvider” under Tools > Options. In the configuration window, scroll through the list until you find Rithmic for NinjaTrader Brokerage and double-click it.
Step 4: Enter Credentials and Select “Rithmic Paper Trading”
In the properties panel on the right, paste your Rithmic username and password. Crucially, you must select Rithmic Paper Trading from the “System” dropdown menu. The server location should typically be set to Chicago.
Step 5: Connect and Confirm Your Account is Active
Click “Apply” and “OK” to exit. Return to the Connections menu and select your newly configured Rithmic connection.
Wait a moment for the indicator light to turn green, confirming that your platform is receiving data and ready to execute trades.
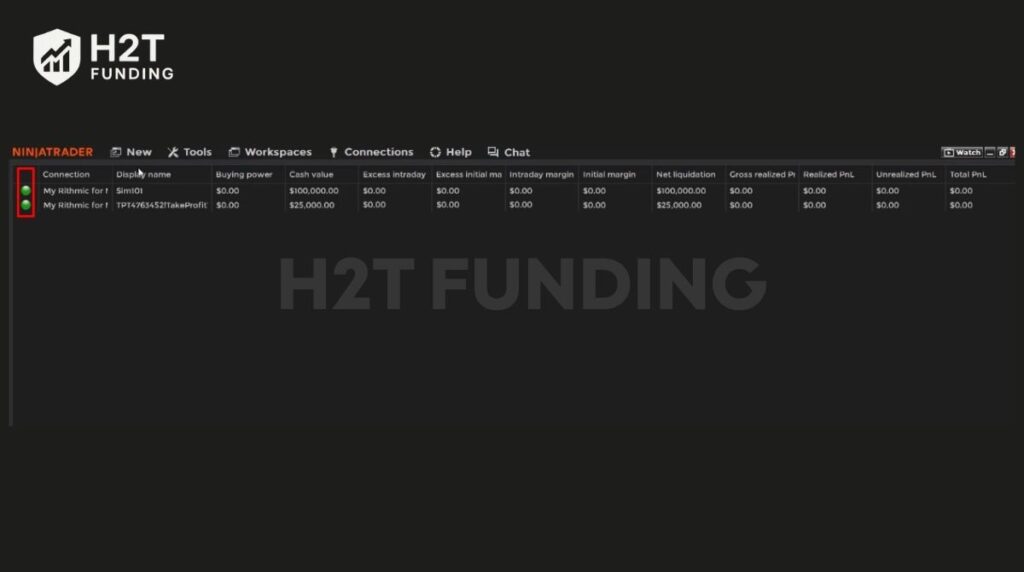
With your Rithmic feed active and connected, you are ready to trade. The most important detail to remember is always selecting “Rithmic Paper Trading” as the system during setup. Choosing the wrong system is the most common reason for connection failures. The green light in the Control Center is your final confirmation that everything is working correctly.
3. Mastering ATM strategies to automate your trades
Mastering NinjaTrader’s Automated Trade Management (ATM) is essential for professional execution. This feature allows you to pre-define your exit rules before you even enter a trade, ensuring that a stop loss and profit target are placed the exact millisecond your order is filled. This automation is critical for protecting your account from sudden market spikes.
3.1. What is an ATM strategy, and why is it a game-changer for prop firm traders?
An ATM Strategy is a built-in function that manages your open positions automatically. For prop firm traders, this is a game-changer because it removes emotion from the exit process. Instead of hesitating to place a stop loss or fumbling with your mouse during high volatility, the software handles it for you instantly.
This is particularly vital when dealing with Take Profit Trader’s intraday trailing drawdown. By having a hard stop loss automatically applied to every trade, you prevent a single bad decision from violating your daily loss limit. It acts as an immediate safety net, allowing you to focus entirely on your entry strategy rather than worrying about order execution mechanics.
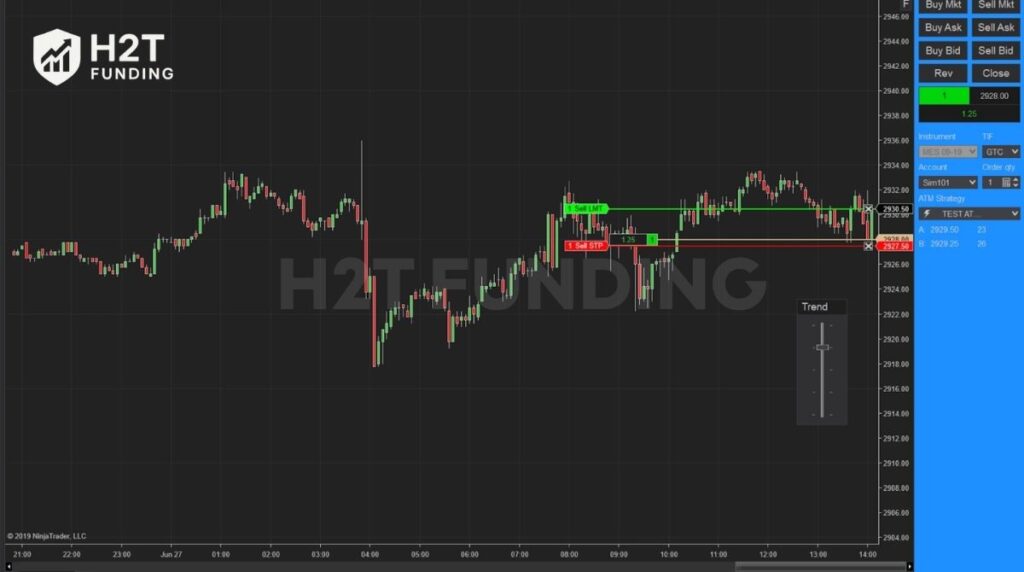
3.2. How to create your first ATM strategy (Profit target & stop loss)
Setting this up is simple and does not require any coding or complex scripts. You can configure this directly from the Chart Trader panel on the right side of your screen.
Step 1: Open the Menu
On the right side of your chart, locate the “ATM Strategy” dropdown menu, which usually says “None” by default. Click it and select Custom.
Step 2: Define Your Parameters
A window will appear, allowing you to set values. Ensure the parameter type is set to Ticks rather than Price or Currency.
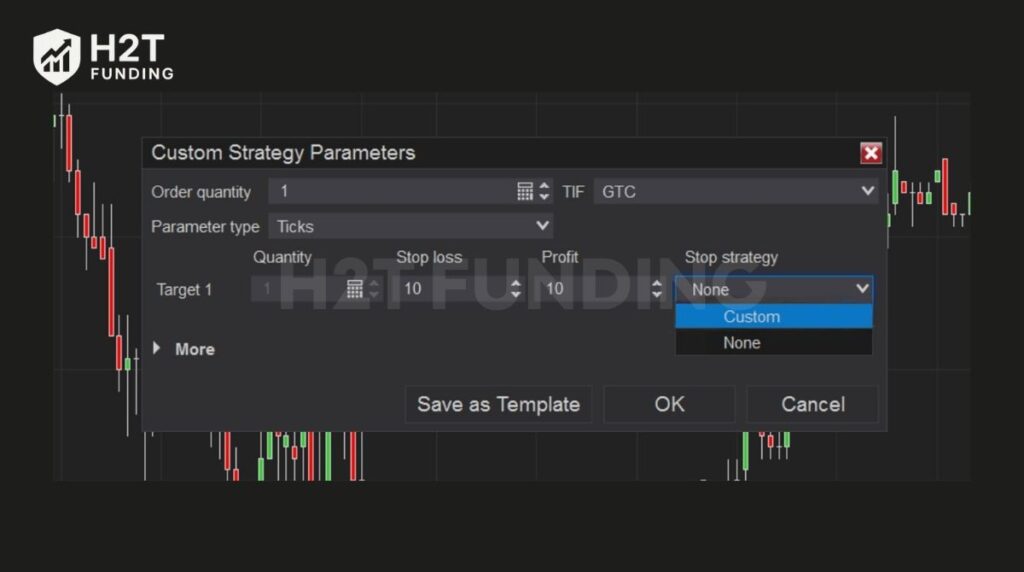
Step 3: Input Values
Enter your desired number of ticks for the “Stop loss” and “Profit” fields. For example, entering ’20’ means the system will place orders 20 ticks away from your entry price.
Step 4: Save the Template
Once configured, click “Save as Template” and give it a clear name, such as “NQ Scalp” or “ES Day Trade.” This allows you to load these exact settings instantly for future sessions.
3.3. Example ATM setup for a Take Profit Trader account
To help you get started, here is a balanced setup often used by traders attempting to pass an evaluation without hitting the drawdown limit. This example assumes you are trading the S&P 500 E-mini (ES).
- Quantity: 1 Contract
- Stop Loss: 12 Ticks (This represents a risk of $150 per contract). Keeping this tight ensures you cut losers before they damage your daily limit.
- Profit Target: 24 Ticks (This targets a profit of $300 per contract). This creates a 1:2 Risk/Reward ratio, meaning you only need to be right less than 50% of the time to break even.
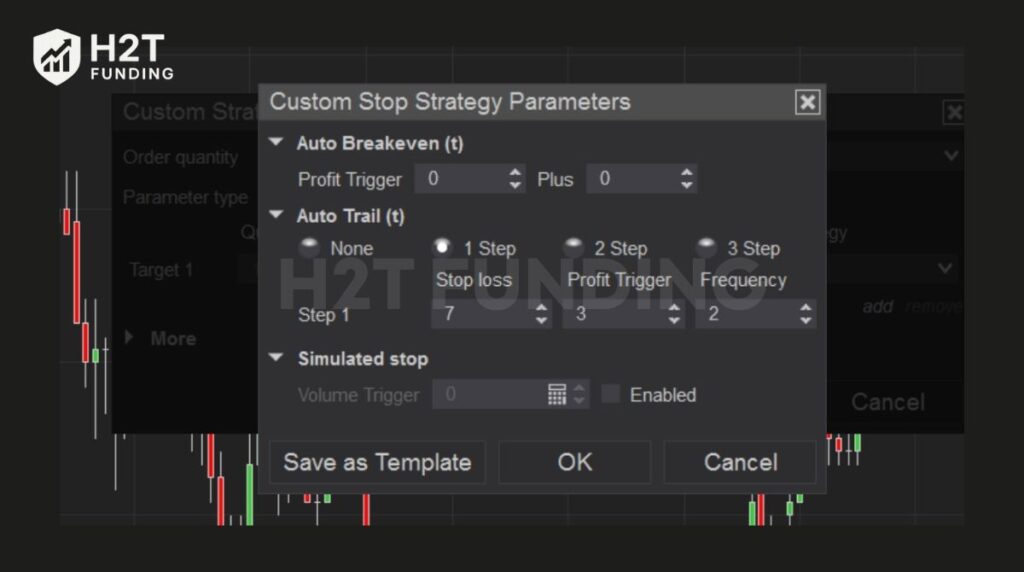
- Stop Strategy: Select “Auto Breakeven.” You can configure the strategy to move your Stop Loss to your entry price automatically once the trade moves 12 ticks in your favor, securing a risk-free trade.
Implementing an ATM strategy is the most effective way to enforce discipline on a technical level. By automating your exits, you eliminate the hesitation that causes large losses and ensure every trade adheres to your risk management plan
Before placing a live trade, always test your ATM configuration in the simulation environment to ensure the brackets appear exactly where you expect them to.
4. What real traders are saying on Reddit about Take Profit Trader NinjaTrader setup
To understand the real-world application of NinjaTrader with a funded account, we looked at discussions from the r/Daytrading community. While the platform is powerful, the consensus is that mastering its automation features requires patience and sometimes a bit of technical know-how.
Traders appreciate the limitless customization NinjaTrader offers. The community frequently discusses how combining the platform with external tools (like AI coding assistants) can help build robust strategies. Users also highlight the quality of the technical support available for the platform.

As seen above, the flexibility of NinjaTrader allows creative traders to build complex setups that go beyond simple stop losses. The ecosystem is supportive, meaning if you want to automate a specific Take Profit Trader strategy, the resources and community support are there to help you succeed.
However, the transition to full automation isn’t always smooth. Advanced features, such as setting stops based on previous candle highs/lows (rather than fixed ticks), often require diving into “Ninjascript.” This can be a hurdle for non-technical traders who just want a plug-and-play experience.
While basic ATM strategies are easy to set up, highly specific custom logic requires effort. Beginners should stick to the standard, static ATM templates (e.g., fixed tick targets) provided in this guide before attempting to code complex dynamic strategies that might fail during a live evaluation.
5. Common mistakes to avoid when using NinjaTrader with prop firms
Even experienced traders lose funded accounts due to simple platform errors rather than bad trading decisions. NinjaTrader is a professional tool, but one wrong setting or accidental click can cost you your evaluation fee instantly.
5.1. Mistake #1: Forgetting to select the correct prop firm account
NinjaTrader often defaults to its internal simulation account, known as “Sim101,” whenever you launch the software. If you execute a winning trade on Sim101, thinking it was your Take Profit Trader evaluation, those profits will not count toward your target. Always double-check the account dropdown menu in the Chart Trader or SuperDOM panel before clicking buy or sell to ensure your specific TPT account is selected.
5.2. Mistake #2: Misunderstanding how the intraday drawdown works with ATM
Your ATM strategy places a static stop loss, but it does not stop the prop firm’s drawdown calculator from moving. Take Profit Trader enforces an intraday trailing drawdown that rises with your highest unrealized profit. If your trade spikes into profit and then retraces significantly, you could hit your drawdown limit and fail the account, even if your ATM stop loss was never touched.
5.3. Mistake #3: Not disabling the chart trader after use
Leaving the Chart Trader panel active and armed on your screen is a recipe for disaster. It is remarkably easy to accidentally click the chart and open an unintended position while simply trying to drag the chart or analyze price action. To prevent these “fat finger” errors, always collapse the Chart Trader panel or switch it to “Hidden” mode immediately after you finish managing your current positions.
Avoiding these technical pitfalls is just as important as having a winning strategy. By building a habit of verifying your account selection and understanding the difference between platform stops and prop firm rules, you protect your capital from avoidable errors. Treat your platform setup as a non-negotiable part of your daily risk management routine.
6. FAQs
Yes, absolutely. NinjaTrader 8 is fully supported and is one of the preferred platforms for Take Profit Trader users due to its advanced charting and automation capabilities. You simply need to configure the connection using the credentials provided in your dashboard.
You can do this by using the ATM Strategy feature located on the right side of the Chart Trader panel. Select “Custom” from the dropdown menu, then input your desired number of ticks for both the profit target and stop loss before entering a trade.
To see the trading panel, open a chart and look for the Chart Trader icon (it looks like a mouse cursor) in the top toolbar. Click it and select “Chart Trader” to reveal the buy/sell buttons and ATM controls on the right side of your screen.
The main difference lies in the connection type you select in the Control Center. For CQG accounts (using Tradovate credentials), you select the standard “NinjaTrader” connection. For Rithmic accounts, you must select “Rithmic for NinjaTrader Brokerage” and choose the correct server gateway (usually Chicago).
Yes, for the purpose of the evaluation. Take Profit Trader provides a license key in your dashboard that unlocks the necessary features for trading futures on NinjaTrader 8 without you needing to buy a lifetime license immediately.
No, it does not guarantee safety. While an ATM strategy limits losses on individual trades, it does not track your intraday trailing drawdown. You must still monitor your total account equity to ensure unrealized profits do not retrace enough to hit your failure threshold.
Yes, you can. One of the biggest advantages of NinjaTrader is its open ecosystem. You are generally free to install and use third-party custom indicators, strategies, and add-ons to assist your trading decisions within the Take Profit Trader environment.
You can download the installer directly from the official NinjaTrader website after creating a free user profile. Alternatively, Take Profit Trader often provides a direct download link within the “Platforms” or “Connection” section of your user dashboard.
Yes, the technical setup is very similar. Most futures prop firms utilize either Rithmic or Tradovate technology. Once you master the connection setup for TPT, you can easily apply the same knowledge to connect accounts from other firms.
A take-profit order is a pending instruction to close your trade at a specific price, effectively locking in your gains. In NinjaTrader, this is handled automatically by your ATM strategy to ensure you don’t miss the exit due to hesitation.
You must trade for a minimum of 5 days. Even if you reach your profit target on the first day, you are required to place at least one trade on four additional separate days to meet the consistency and activity requirements.
7. Conclusion
Mastering the Take Profit Trader NinjaTrader setup is your first real step toward becoming a professional, funded trader. By correctly configuring your connection and utilizing tools like ATM strategies, you remove technical friction and free up your mental energy to focus on what matters most: reading the market.
Are you ready to optimize your setup further or find the best funding programs? Visit the Prop Firm & Trading Strategies category at H2T Funding. We provide in-depth tutorials, platform hacks, and independent reviews to help you pass your evaluations and secure your financial future. Start your journey with the right knowledge today!