If you’re wondering how to connect Tradovate to TradingView, the process is actually straightforward and unlocks powerful charting and execution capabilities. To get started, you simply activate the TradingView add-on in your Tradovate settings, then head to the Trading Panel in TradingView to select Tradovate and log in.
At H2T Funding, we know that a seamless setup is essential for trading success. That’s why this guide walks you through each step clearly so you can connect Tradovate to TradingView without running into frustrating errors.
Key takeaways
- Before anything else, you must ensure your account supports the TradingView integration. While many modern accounts have this enabled by default, you may need to verify it in your Tradovate account’s Application Settings.
- The entire connection process is initiated from the Trading Panel located at the bottom of your TradingView chart, not from Tradovate.
- For all prop firm-funded accounts (like Topstep or Apex) and simulation accounts, you must choose the Demo connection type to avoid login errors. This is the most common mistake traders make.
- You can follow a similar process to connect Tradovate to the TradingView mobile app, allowing you to manage trades directly from your phone.
1. Why connect Tradovate to TradingView?
Connecting these two platforms gives you the best of both worlds: Tradovate’s fast, reliable futures execution combined with TradingView’s world-class charting software. This integration creates a more powerful and efficient environment, allowing traders to analyze and act with greater precision.
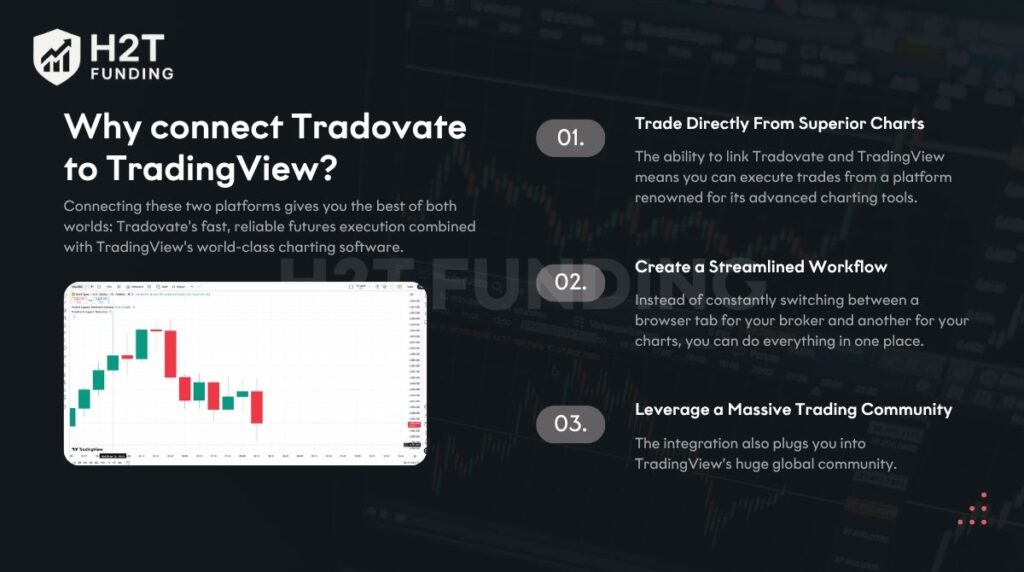
Here are the primary advantages you gain:
- Trade Directly From Superior Charts: The ability to link Tradovate and TradingView means you can execute trades from a platform renowned for its advanced charting tools. You get access to a vast library of indicators, sophisticated drawing tools, and a highly intuitive user interface that makes technical analysis seamless.
- Create a Streamlined Workflow: Instead of constantly switching between a browser tab for your broker and another for your charts, you can do everything in one place. This reduces the chance of execution errors and saves valuable time, which is critical in fast-moving markets. Your entire trade activity, from analysis to placing an order, happens on a single screen.
- Leverage a Massive Trading Community: The integration also plugs you into TradingView’s huge global community. You can access thousands of custom indicators and strategies built by other traders, giving you fresh perspectives and new tools to refine your approach without needing third-party software.
In essence, making this connection elevates your trading setup. It allows you to focus more on your trading plan and less on the logistics of managing multiple platforms.
2. Before you start: A quick checklist
Before you begin the actual process of linking the platforms, you must ensure you have four essential components ready to go. Preparing these items in advance will save you time and prevent common login failures.
- Have an active account ready: You need a Live Tradovate brokerage account or a funded prop firm profile, such as Topstep or Apex.
- A registered TradingView profile: Both basic and pro versions are supported. Many beginners ask how to connect Tradovate to TradingView for free, and the good news is that the free tier works perfectly.
- Your exact login details: Make sure you have your specific broker username and password on hand. You will need to type these credentials manually during the setup process.
- Enable the required Add-On: The specific TradingView extension must be turned on inside your broker’s application settings.
If you are figuring out how to connect your Tradovate account to TradingView for the first time, missing any of these preliminary steps will stop you from moving forward.
Taking a few minutes to verify your settings and gather your details makes the entire setup seamless. Once everything on this checklist is confirmed, you are fully prepared to establish the link.
3. How to connect Tradovate to TradingView (Step-by-step)
To successfully link your systems, you must first enable the broker extension, then sign in directly through your charting interface. Following these exact phases ensures proper API connectivity without any frustrating login errors.
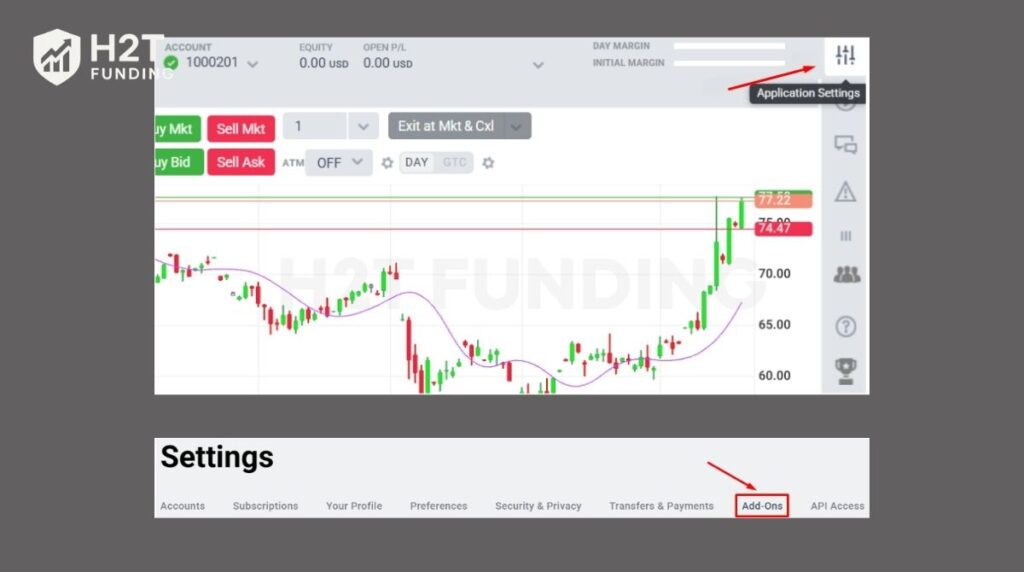
Step 1: Activate the Required Extension
Begin by logging into your broker’s web dashboard. Navigate to the top right corner and open your trade settings, specifically looking for Application Settings. From there, select the Add-Ons tab. Check if the charting software integration is already active; if not, scroll down and click the activate button.
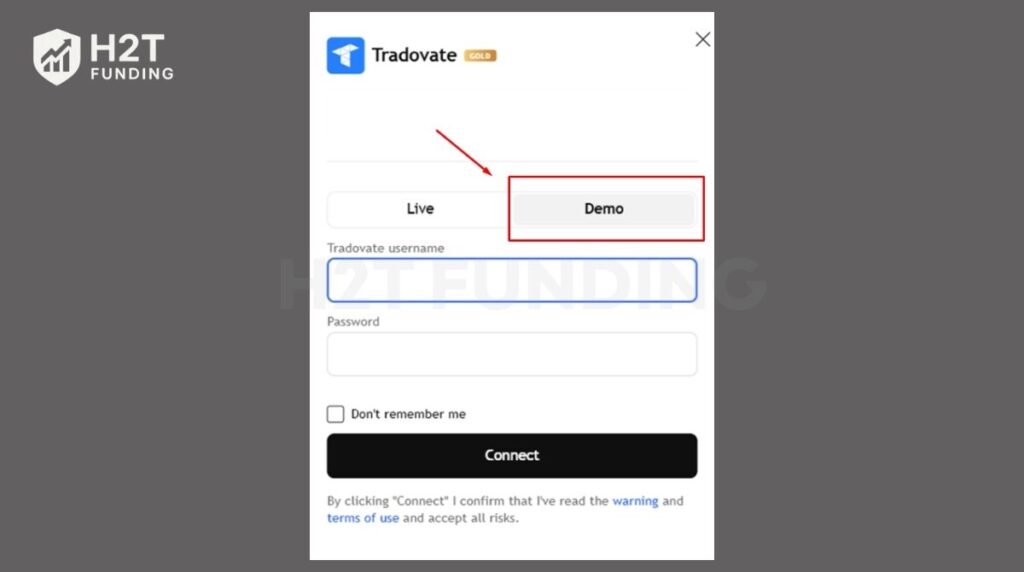
Step 2: Log In Through the Trading Panel
Next, open a fresh chart on your preferred charting platform. Look at the bottom of your screen and open the Trading Panel tab. Search the broker list and select your provider. A login pop-up will appear, requiring your specific username.
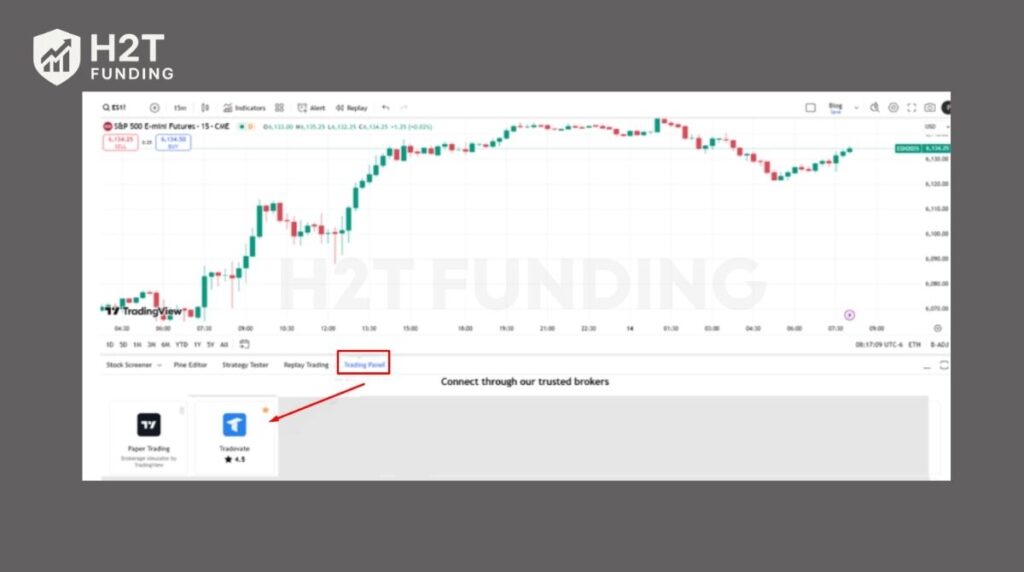
This is where many traders get confused, especially those figuring out how to connect Tradovate to TradingView Alpha Futures. When prompted for the connection type, you must select the Demo option. This strict rule applies to both standard evaluations and live funded profiles. Choosing the live option will instantly reject your login attempt.
Once you hit connect, the system performs a quick data verification. You will immediately see seamless synchronization of your account balances. This allows for excellent position monitoring right on your screen, making it easy to manage your active trades directly from the chart.
In conclusion, establishing this link only takes a few clicks if done in the correct order. By enabling the extension first and selecting the simulated environment during login, you guarantee a smooth start to your trading session.
4. Connecting a prop firm account (Topstep, Apex, etc.)
To properly link an evaluation or funded profile, you must always select the demo data feed during the login phase. Many users struggle with how to connect Tradovate to TradingView Topstep because they mistakenly pick the live option. Choosing the live environment will instantly block your access and cause frustrating login loops.
Why does this happen? Prop firms operate entirely on simulated infrastructure. Even when you pass an evaluation, your funded profile remains on a demo data feed. The firm simply copies your orders to their master live book behind the scenes to minimize latency. Therefore, your credentials are only valid for the simulated side of the broker’s system.
Using the correct feed is also vital for proper risk management. Prop firms track your drawdown and maximum loss limit strictly through their simulation servers. If you experience technical issues because of an incorrect login type, you might unknowingly violate the rules. Always double-check this selection before hitting enter.
In summary, treating your funded profile as a demo login is the exact secret to a successful process. Remembering this single rule guarantees a stable link and keeps your focus firmly on executing your strategy properly.
Read more:
5. How to connect Tradovate to TradingView on mobile (iOS & Android)
Connecting your broker profile on a smartphone uses almost the exact same steps as the desktop version. For those wondering how to connect Tradovate to TradingView mobile, the process begins directly inside the charting application on your device.
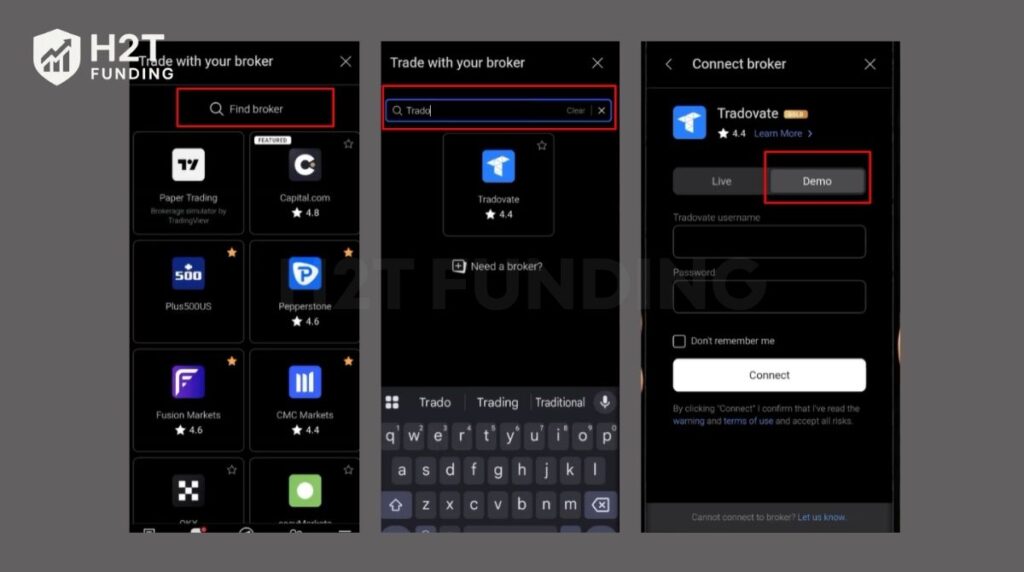
Here are the simple steps to follow:
- Open the mobile application: Launch the app on your iOS or Android device and open any active chart. This answers the common question of how to connect Tradovate to TradingView on iPhone.
- Access the broker screen: Tap the menu or the specific icon representing the broker panel at the bottom of your screen.
- Enter your details: Select the correct provider from the broker list. You will need to carefully type your specific username to proceed.
- Select the correct environment: Just like on a computer, you must choose the Demo option for funded profiles to avoid immediate login errors.
Once successfully linked, you can easily set custom alerts directly from your phone. This ensures you never miss a major market move while away from your primary desk.
In conclusion, establishing this link on a smartphone provides ultimate flexibility for managing trades on the go. As long as you strictly follow the exact same login rules as the desktop setup, your mobile trading experience will remain extremely smooth and reliable.
6. Troubleshooting: Common connection issues & fixes
Fixing common linking problems is usually simple once you understand the root cause of the error. If you follow the correct setup steps but still face hurdles, here are the most effective solutions for real-world problems.
6.1. Login loops or Unauthorized errors
If you encounter an infinite login loop or an unauthorized pop-up, the issue is typically related to your setup environment.
- Verify your extension: Ensure the integration feature is actually toggled on in your broker dashboard.
- Check your environment: Always pick the demo option for funded profiles.
- Clear your browser data: Try opening an incognito window or clearing your cache to fix the infinite loop.
If you are figuring out how to connect Tradovate to the TradingView app without these glitches, clearing cookies often solves the problem immediately.
6.2. Non-Tradeable Symbol order rejections
Receiving a rejection message about a non-tradeable symbol usually means there is a problem with your market data or the specific asset.
- Check data feeds: Your charting software uses the live market data directly from your broker. Ensure you have an active subscription there.
- Avoid expired contracts: Always verify that you are trading the current, active futures contract month.
- Review firm rules: If using an evaluation account, confirm that the specific instrument is allowed by their risk department.
6.3. Broker not showing in the list
If you cannot find your specific broker in the connection panel, a simple page refresh is usually the best fix. Simply reload your browser or restart the desktop software, and the logo should appear. This is also a helpful tip if you are learning how to connect Tradovate to the TradingView mobile app and the list fails to load.
In conclusion, troubleshooting these errors is a straightforward process when you know exactly what to check. By verifying your data feeds, clearing your browser history, and selecting the correct login environment, you can quickly resolve these common technical hurdles.
7. FAQs
The most common reason for login failure is forgetting to activate the required extension in your broker settings. Another major cause is picking the live environment instead of the demo option for funded profiles. Always double-check these two specific settings before attempting another login.
Yes, the actual process of establishing the link is completely free. While standard personal profiles might pay a small monthly fee for the extension, most modern prop firms provide this feature at no extra cost.
No, you do not need to pay for a separate TradingView data subscription. Once your systems are successfully linked, TradingView recognizes your active market data subscription from Tradovate, allowing you to execute trades without paying for data twice.
You can easily switch between multiple evaluation or funded profiles directly from the bottom interface. Just click the dropdown menu at the top of the panel and select the specific profile you want to use.
Yes, you can set precise stop loss and take profit parameters. However, you must attach these bracket rules to an entry ticket inside the order panel before execution. You cannot add them to a position that is already open on the chart.
Estimated profit and loss values for a linked broker profile are not displayed directly on the visual chart. Instead, you must monitor your exact P/L numbers inside the bottom tab.
Yes, it is highly secure to establish this link. The charting interface uses secure authentication protocols and acts solely as a visual bridge, routing all commands directly to the broker’s secure servers.
8. Conclusion
Learning exactly how to connect Tradovate to TradingView is a crucial step for any serious futures trader. By following the precise setup instructions outlined above, you can easily avoid common login errors. This powerful integration allows you to execute trades directly from industry-leading charts, ultimately streamlining your daily routine.
Now that your charting software and broker are perfectly synced, it is time to focus on executing profitable setups. If you want to maximize your potential with funded accounts, we are here to guide you. Be sure to read the in-depth articles in the Prop Firm & Trading Strategies category on H2T Funding to elevate your trading journey today!